The Line Editor is one of the key features within finalToon. All possible combinations and line style settings can be adjusted from within the Line Editor.
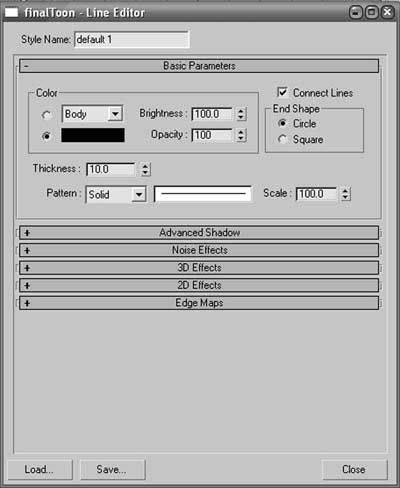
finalToon Line Editor
The Line Editor is invoked by clicking the line style button next to any of the line types (Fold, Crease, etc.) from either the Render Effects > Default Edges rollout, or from the finalToon - Edges rollout within a finalToon material. All line types have the same options and possibilities, which are described in the sections below.
Each line style drawn in finalToon shares the same basic parameters. The common parameters of a line can be adjusted in the rollout shown above. Common parameters are, for example, line color, thickness and opacity.
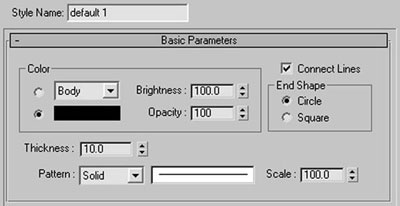
finalToon Basic Parameters rollout
Style Name - The Style Name window is actually above the Basic Parameters rollout, and can either be set manually or defined by loading a certain style. This is an excellent way to help differentiate the various line style configurations you create.
Color group of controls
The line style color can be defined in several ways. Within this group of controls you can choose to have the line color based on the applied or on one you set manually.
Material dropdown box (Line Editor) - Choosing this radio button lets you define the line style color by the diffuse material color (Body), the ambient color (Shadow) or the specular color (Specular).
Color Swatch (Line Editor) - Activate the Color Swatch radio button to define an individual line color, independent of the material color the object uses.
Brightness (Line Editor) - This parameter controls the brightness of the line color independently of the actual color set in the material. This is great, for example, if you want to keep the outlines the same color as the object itself, but you want to make the lines stand out so you adjust the Brightness spinner to make the lines brighter or darker. Higher values will make the colors brighter, lower values make them darker. 100 is the default.
Opacity (Line Editor) - Each line style can have its own opacity level. Use this parameter to set the opacity level for the line style. 100 means fully opaque while 0 means fully transparent.
Opacity 50% Opacity 100%
End Shape group of controls
The End Shape options determine how the ends of the line style will be shaped. Check the Circle radio button to use a filled circle as the line cap. This feature is used to smoothly connect lines with each other. You may also choose Square for end caps when you want hard edges to your line style.

Circle End Shape Square End Shape
Thickness (Line Editor) - This parameter defines the thickness of the line. Higher values will create thicker line styles while lower values will create thinner line styles. Depending on the Resolution Independent parameter, line thickness is measured in 3ds Max units.
Pattern (Line Editor) - Each line style may have a different line pattern. Dotted line patterns are common in technical illustration renderings where the hidden lines are displayed. The following line patterns are available:
|
Dashed: |
|
Dotted: |
|
|
Center: |
|
Hidden: |
|
|
Phantom: |
|
Dashdot: |
|
|
Border: |
|
Divide: |
|
Scale (Line Editor) - Scale defines the size of the line patterns described above. Smaller numbers will shrink the line pattern resulting in more repetitions. Bigger numbers will scale the line pattern. Please note that this spinner does not alter the thickness of the line style.
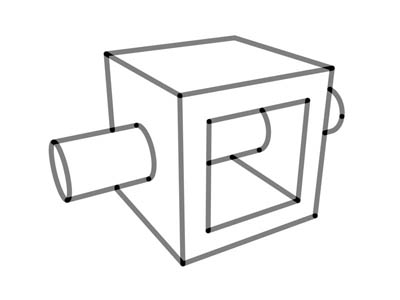
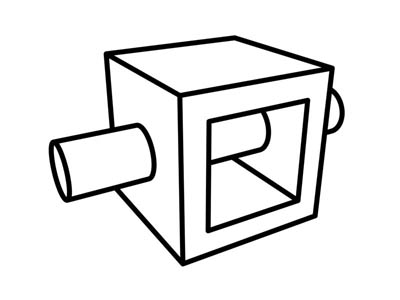
TIP: Use the Connect Lines option to get correct line patterns around and within an object. If you do not use the Connect Lines feature, you may discover discontinuities as the lines restart at each segment within the geometry.
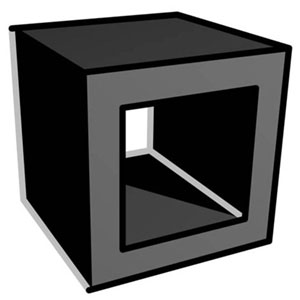
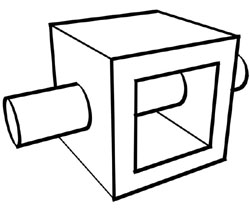
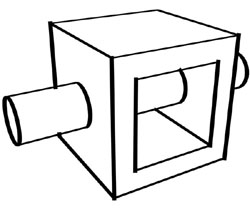
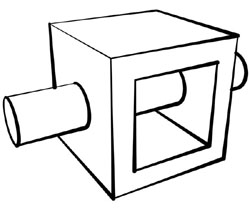
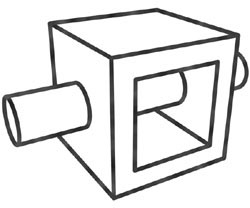
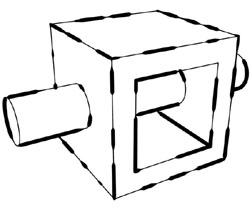
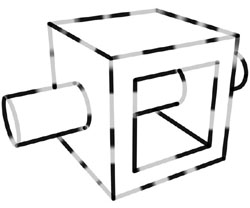
Connect Lines (Line Editor) - The connect lines function is a great way to get rid of the underlying mesh structure and helps keep line styles continuous. Effects like noise or 2D effects like pen pressure are usually only good when this option is checked. The images below show the influence the Connect Lines option can have on your output. Also be aware the activating the checkbox activates it for all other rollouts within the Line Editor.
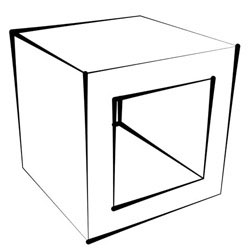
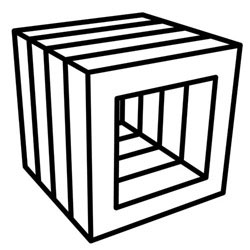
Connected Lines = Off Connected Lines = On
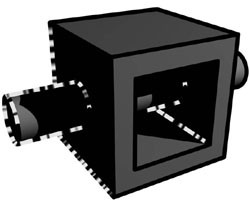
Actual Mesh Data
finalToon allows the user to control line styles in various situations. The Advanced Shadow rollout allows you to control how the same line style looks in light and shadow. Lines that are drawn in shadow areas can be set to appear with a different style.
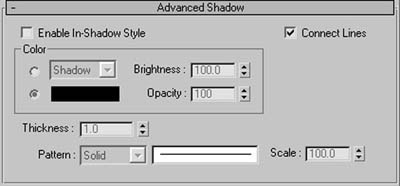
Note: This feature is not a real shadow line tracer. The shadow and light information is taken from the nearest vertex position, so please be sure that enough information is available by creating a well tessellated object.
Enable In-Shadow Style
Check this option to activate the In-Shadow rendering effect for the selected line type. As you can see in the illustrations above, the lines that are in the shadow are drawn much brighter. You can choose any color or effect you want for the lines in the shadow region.
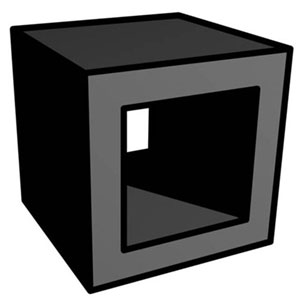
In-Shadow Style Off In-Shadow Style On
Color group of controls
Material dropdown (Advanced Shadow)
Choosing this radio button lets you define the line style color by the diffuse material color (Body), the ambient color (Shadow) or the specular color (Specular).
Color Swatch (Advanced Shadow)
Activate the Color Swatch radio button to define an individual line color, independent of the material color the object uses.
Brightness (Advanced Shadow)
This parameter controls the brightness of the line color independently of the actual color set in the material. This is great, for example, if you want to keep the outlines the same color as the object itself, but you want to make the lines stand out so you adjust the Brightness spinner to make the lines brighter or darker. Higher values will make the colors brighter, lower values make them darker. 100 is the default.
Opacity (Advanced Shadow)
Each line style can have its own opacity level. Use this parameter to set the opacity level for the line style. 100 means fully opaque while 0 means fully transparent.
Thickness (Advanced Shadow)
This parameter defines the thickness of the line. Higher values will create thicker line styles while lower values will create thinner line styles. Depending on the Resolution Independent parameter, line thickness is measured in 3ds Max units.
Pattern (Advanced Shadow)
Each line style may have a different line pattern. Dotted line patterns are common in technical illustration renderings where the hidden lines are displayed. The following line patterns are available:
|
Dashed: |
|
Dotted: |
|
|
Center: |
|
Hidden: |
|
|
Phantom: |
|
Dashdot: |
|
|
Border: |
|
Divide: |
|
Scale (Advanced Shadow)
Scale defines the size of the line patterns described above. Smaller numbers will shrink the line pattern resulting in more repetitions. Bigger numbers will scale the line pattern. Please note that this spinner does not alter the thickness of the line style.
TIP: Use the Connect Lines option to get correct line patterns around and within an object. If you do not use the Connect Lines feature, you may discover discontinuities as the lines restart at each segment within the geometry.
Connect Lines (Advanced Shadow)
The connect lines function is a great way to get rid of the underlying mesh structure and helps keep line styles continuous. Effects like noise or 2D effects like pen pressure are usually only good when this option is checked. The images above shows the influence the Connect Lines option can have on your output. Also be aware the activating the checkbox activates it for all other rollouts within the Line Editor.
Many renderings or visualizations today show a lack of individuality or personality. All of them have the same, super smooth and ultra clean style. Even 2D line renderings look just too clean; too perfect.
In many instances it is desirable to have a more inaccurate, hand drawn look applied to our renderings to give them a more dynamic yet organic feel. finalToon is a powerful tool that can create many hand drawn styles and scribble looks without any trouble. And it is within the Noise Effects rollout where many of these amazing tools reside.
Step (Noise Effects) - Lines in finalToon are drawn as vectors. A vector line is usually defined by two points, one starting point and one endpoint, and between those two points a line is drawn. This line can be sampled as it is drawn along its path, and effects can be applied to the line to alter it. Effects, for example, like distortion, opacity or thickness. The Step spinner defines the number of samples that are taken as the line is drawn. Smaller step values will create a “finer” detail within the final effect. Bigger values will result in larger, more coarse steps from one end of the line to the other. Be aware that the Step value is global in nature, and setting the value in this rollout sets it for all of the other rollouts in the Line Editor for that line style.


Step = 5 Step = 250
Connect Lines (Noise Effects) - The connect lines function is a great way to get rid of the underlying mesh structure and helps keep line styles continuous. Effects like noise or 2D effects like pen pressure are usually only good when this option is checked. Be aware the activating the checkbox here activates it for all other rollouts within the Line Editor.
Noise Thickness (Noise Effects) - The Noise Thickness checkbox creates a random variation of the thickness of the line as it is drawn.

Thickness variation No thickness variation
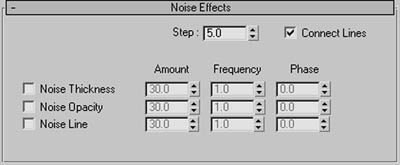
There are three parameters that control the noise effect:
AMOUNT - This spinner defines the strength of the noise effect. Larger values produce more pronounced variations in thickness.
FREQUENCY - This spinner controls the repetition of the noise effect or how often it cycles. Larger values cause the variations to repeat more often.
PHASE - This spinner controls the position of the noise function.
Noise Opacity (Noise Effects) - The Noise Opacity checkbox creates a random variation of the line’s opacity as it is drawn. The same three parameters, described above, let you control the noise effect of the relevant line style.
Noise Line (Noise Effects) - The Noise Line checkbox creates a random variation of the line’s position in relation to the object when drawn. The same three parameters, described above, let you control the noise effect of the relevant line style. Be aware that large Amount values can cause the line style to completely “detach” from the object and float around it.
finalToon has the big advantage of being a real 3D renderer with full access to the 3D data within your scene at render time. This makes it possible to create line drawing effects based on true 3D information.
finalToon 3D Effects rollout
A line may fade into the distance, for example, by getting thinner or more transparent, and the 3D Effects rollout is where you control those options.
Step (3D Effects) - Lines in finalToon are drawn as vectors. A vector line is usually defined by two points, one starting point and one endpoint, and between those two points a line is drawn. This line can be sampled as it is drawn along its path, and effects can be applied to the line to alter it. Effects, for example, like distortion, opacity or thickness. The Step spinner defines the number of samples that are taken as the line is drawn. Smaller step values will create a “finer” detail within the final effect. Bigger values will result in larger, more coarse steps from one end of the line to the other. Be aware that the Step value is global in nature, and setting the value in this rollout sets it for all of the other rollouts in the Line Editor for that line style.
Step = 5 Step = 250
Connect Lines (3D Effects) - The connect lines function is a great way to get rid of the underlying mesh structure and helps keep line styles continuous. Effects like noise or 2D effects like pen pressure are usually only good when this option is checked. Be aware the activating the checkbox here activates it for all other rollouts within the Line Editor.
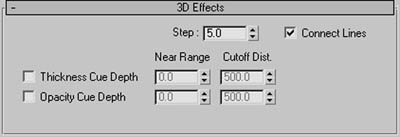
Thickness Cue Depth - The Thickness Depth Cue checkbox lets you change of line thickness based on the distance to the camera. Values for both the Near Range and Cutoff Distance spinners are defined in 3ds Max units.
Opacity Cue Depth - The Opacity Depth Cue checkbox lets you change of line opacity based on the distance to the camera. Values for both the Near Range and Cutoff Distance spinners are defined in 3ds Max units.
finalToon’s 2D paint effects are based on screen coordinates and also sometimes on the length of the line. The 2D Effects rollout is where you create and control these advanced effects.
Worth noting here is that you can create many advanced line drawing effects with 2D Effects combined together with 3D effects.
Step (2D Effects) - Lines in finalToon are drawn as vectors. A vector line is usually defined by two points, one starting point and one endpoint, and between those two points a line is drawn. This line can be sampled as it is drawn along its path, and effects can be applied to the line to alter it. Effects, for example, like distortion, opacity or thickness. The Step spinner defines the number of samples that are taken as the line is drawn. Smaller step values will create a “finer” detail within the final effect. Bigger values will result in larger, more coarse steps from one end of the line to the other. Be aware that the Step value is global in nature, and setting the value in this rollout sets it for all of the other rollouts in the Line Editor for that line style.
Step = 5 Step = 250
Connect Lines (2D Effects) - The connect lines function is a great way to get rid of the underlying mesh structure and helps keep line styles continuous. Effects like noise or 2D effects like pen pressure are usually only good when this option is checked. Be aware the activating the checkbox here activates it for all other rollouts within the Line Editor.
Extend (2D Effects) - The Extend checkbox lets you force the ends of the lines you draw to overlap and extend beyond their normal endpoint. finalToon will extend (lengthen) the relevant line style beyond its endpoints by the amount (in units) in the spinner. Keep in mind that this effect is available for visible lines only. Line types that are not drawn will also not show the extension. The illustration above shows an example of using the Extend effect.
Extended Lines Active
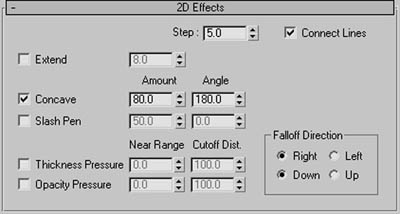
Concave Lines (2D Effects) - The Concave Lines checkbox gives you the ability to create lines that start thin, then get wider and then shrink again. The Amount spinner defines the strength of the effect (with larger values producing more pronounced tapering), while the Angle spinner defines the center point for the maximum bulge in the line style. This effect works best when Connect Lines is turned on.
Concave: Angle = 180 Concave: Angle = 45
Slash Pen Lines (2D Effects) - The Slash Pen checkbox allows you to use a special type of brush to draw the lines with. Similar in profile to a rectangular marker pen, the direction plays a big role in the final line style. Vertical lines are usually drawn thinner than horizontal lines. The Amount spinner defines the strength of this effect (with larger values producing more pronounced differences in the vertical/horizontal thickness) while the Angle spinner controls the rotation of the pen.
Slash Pen: Angle = 135 Slash Pen: Angle = 0
Thickness Pressure (2D Effects) - The Thickness Pressure checkbox gives you a 2D method to make the line style get thinner with distance. The maximum thickness will start at Near Range spinner’s value and will fade to 0 thickness at the Cutoff spinner’s distance. Ranges are specified in 3ds Max units of the line length. Connected lines make more sense with this option and it should be noted that this effect is also affected by the Falloff Direction controls.
Thickness Pressure = Active Thickness Pressure = Off
Opacity Pressure (2D Effects) - The Opacity Pressure checkbox gives you a 2D method to make the line style get more transparent with distance. The line will be completely opaque at Near Range spinner’s value and will fade to full transparency at the Cutoff spinner’s distance. Ranges are specified in 3ds Max units of the line length. Connected lines make more sense with this option and it should be noted that this effect is also affected by the Falloff Direction controls.
Opacity Pressure = Active Opacity Pressure = Off
Falloff Direction group of controls
Right/Left (2D Effects) - Check either Right or Left to decide the direction finalToon uses for either of it’s 2D pressure effects. In one situation the pressure effect starts at the left-hand side of the scene and fades as it moves right, and in the other, it starts from the right-hand side and fades as it moves left.

Thickness Pressure = Right Thickness Pressure = Left
Up/Down (2D Effects) - Check either Up or Down to decide the direction finalToon uses for either of it’s 2D pressure effects. In one situation the pressure effect starts at the top of the scene and fades as it moves down, and in the other, it starts from the bottom and fades as it moves up.
Thickness Pressure = Up
finalToon offers the ultimate flexibility to control the line styles to the extreme. The ability to use a texture map, for example, opens up an unlimited world of features and flexibility for finalToon renderings.
finalToon Edge Maps rollout
The Edge Maps rollout provides you with a means to use standard 3ds Max maps (both procedural and bitmaps) to control many different effects of a line style.
Color (Edge Maps) - The Color checkbox gives you the ability to colorize the lines based on any texture map. As with any 3ds Max rendering, the object must have proper UV mappings to represent the effect accurately. In the image above, a color Noise texture map was used to colorize the lines. The Amount spinner determines how strong the map is when applied to your line style.
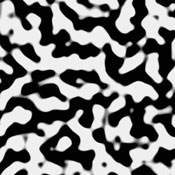
Color Map Stucco Noise Map
Shadow (Edge Maps) - The lines drawn in the non-illuminated area (remember this is not a true shadow, it’s the vertices that counts) may also be controlled via a texture map. The illustrations above show two images, one being the rendered result of using the Shadow Edge Map and the other shows the stucco noise that was used in the shadow areas. The Amount spinner determines how strong the map is when applied to your line style.
Shadow Map Stucco Noise Map
NOTE: In order for the Shadow Map to work, you MUST have Advanced Shadows turned on in its rollout via the Enable In-Shadow Style checkbox. Otherwise, no Shadow mapping will occur.
Thickness (Edge Maps) - Activate the Thickness checkbox to enable control over the line thickness with a texture map. As you can see in the image above the thickness varies according to the noise texture map. The Amount spinner determines how strong the map is when applied to your line style.
Thickness Map Stucco Noise Map
Opacity (Edge Maps) - The Opacity checkbox lets you control the line’s transparency with a texture map. As you can see in the image above, the line’s transparency changes according to the noise map. The Amount spinner determines how strong the map is when applied to your line style. Using Opacity edge maps is useful in situation where you want to simulate the look of a dirty ball point pen.
Opacity Map Stucco Noise Map
Bump (Edge Maps) - The Bump checkbox lets you distort the lines when they are drawn. As you can see in the image above, the line is distorted according to the noise map. This is especially useful when the texture of the object (shading) uses the same bump map. The Amount spinner determines how strong the map is when applied to your line style.

Bump Map Stucco Noise Map