finalToon uses its own internal renderer to create accurate line drawings from the given 3D scene data. Being a true renderer gives finalToon the ability to render all important line styles including hidden lines, which can't be rendered by a shader-only approach. However, you won't find finalToon as another renderer inside of 3ds Max. This is due to the fact that we chose to implement finalToon as a Render Effect, which gives you an enormous amount of flexibility.
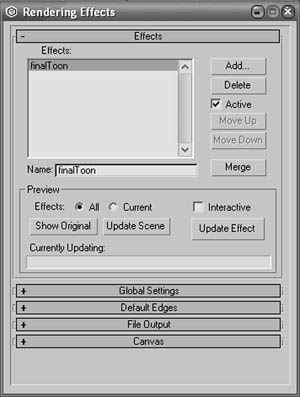
finalToon Render Effect dialog
The biggest benefit to being a Render Effect is that you can use finalToon with any other rendering system as long as it is 100% compatible with the 3ds Max SDK. Keep in mind that not all 3rd party renderers will work very well if they don't support 3ds Max to the full extent as suggested by the 3ds Max Programmer’s Guidelines. We suggest that you use the built-in scanline renderer, which is compatible by default, or use an even more advanced rendering system like finalRender®.
You can manually add the finalToon Render Effect to the list of render effects or it will be automatically added as soon as you create a finalToon material within the Material Editor.
The Global Settings rollout gives you access to the main features of finalToon, which are independent of the line style.
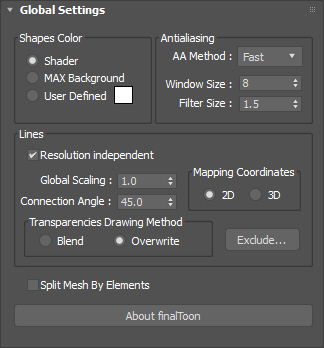
finalToon Global Settings rollout
Split Mesh By Elements - Check this option to enhance the multi threading of finalToon. Rendering is much faster when multiple cores of a CPU are used. Large single object meshes are not easy to process for finalToon, on the other hand 3ds Max works better with less individual objects and thrives with one large mesh. To overcome this situation, check this option.
finalToon will automatically split a single mesh into their logical elements and process each with one core in your system and this results in faster line drawing speeds. This option is perfect when you get assembled CAD drawings with thousands of objects all merged into one mesh for better handling in 3ds Max. This optimization is done at render time and does not change your model in your scene.
Shapes Color group of controls
There are several methods available to you to define the paint color of an object rendered with finalToon. Using the options within the section is the easiest way is to make all objects a single color. This is perfect when you want to have a line drawing only. Three options are available.
Shader - If this option is selected, the standard shading that is assigned to the object will be used. Here you may use any kind of material or shading effect that is offered by the renderer. This is the default selection.
Max Background - Select this option to use the 3ds Max background color for all objects. This will render the objects “invisible“ by using the background color for the as the paint color. However, if the line color is also the same as the background color you will then see no single outline or other line styles.
User Defined - Use the User Defined color option if you wish to set a specific color for all objects in the scene. This will not affect the line colors, it’s only effect is on the object’s shading.
Anti-Aliasing group of controls
Every professional CG artist knows very well that the anti-aliasing functions of a rendering product are the key to top quality images. This is even more true for a line drawing or illustration renderer like finalToon. There are two choices from the drop-down menu: Fast and Quality. Fast AA offers a highly optimized anti-aliasing method that in most situations offers the good quality and speed. However, as you well know, there are always some situations when a good anti-aliasing is not good enough. This is why we have implemented a second anti-aliasing method called “Quality”, and it does what it says! The render time will be a little bit higher but the result should be superb even for your most demanding clients.
AA Filter:Fast - Use the Fast AA setting for most of your renderings. This method should work rock solid for most situations when lines are not smaller than 1 pixel in width.
AA Filter:Quality - As soon as you get into trouble with lines where the width is below a single pixel we suggest to use the Quality setting. This method works especially well on really thin lines and strange angles.
Window Size - Window Size defines the resolution the image should be rendered. To catch really thin lines (below 0.5 pixel width) the renderer has to virtually “zoom” into the region of interest. A value of 8 will create a “virtual” rendering that is 8 times bigger than the rendering resolution set for the image. As long as you render for video output there is no problem at all using higher values.
Filter Size - This value controls the number of pixels that should be considered in the anti-aliasing pass. Higher values will result in a smoother, more blurred image.
Resolution Independent - Check this option to have all lines drawn with the same relative size, independent of the rendering resolution. If this option is unchecked, the line width is measured in pixels. If the line width, for example, is 5, it means that 5 pixels will be used to draw the line when this option is not checked! As you can easily imagine, a rendering of 100x100 pixels would be totally different than a rendering with a resolution of 1000x1000 pixels unless this option is on.
Global Scaling - Sometimes it is useful to change the width of all lines at once. This parameter allows you to do this. The value works as a multiplier for the line width, a setting of 2 will double the width of all lines in the rendering. When you use this setting temporarily, do not forget to set it back to 1.0 at a later stage.
Connection Angle - finalToon is one of the few illustration and cartoon renderers to offer true connected lines in one pass. However, sometimes you do not wish to connect all lines and this setting helps you in controlling this. The Connection Angle value defines the angle between two lines that must be below this value to be connected.
This value is essential for 2D line drawing effects that are based on the length of the line. “Thickness Pressure” is such an effect; the “running out” of ink simulated by fading the line over distance. Only connected lines will show this effect properly. In the other case, the effect starts all over as soon as a line stroke is finished.
Mapping Coordinate - Every line style effect uses mapping coordinates to draw its lines. This option lets you decide if the projection of the line is done in 2D, real 3D space, or to add extra effects to the line. Noise or other line effects are examples of some of the 2D effects.
Transparencies Drawing Method group of controls
Blend - Use the Blend option to treat transparent lines like water color so when two or more lines cross each other, the final color gets darker (less transparent).
Overwrite - Activate this option to have finalToon draw the lines without adding on top of each other. Every line will get the same transparency value, this will hide the crossing areas.
About - Press the About button to get more information about your license of finalToon including build number, and support information.
Default Edges can be used whenever there are no finalToon material assigned to an object. This gives you the freedom to apply line styles on objects that still have the Standard material or any other material assigned. Also, Default Edges are great for interactive line style setup. Changes you make in the Default Edges settings can be updated interactively in 3ds Max. To do so, just activate the Interactive setting in Render Effects. As long as this 3ds Max option is active, all changes will be updated as you modify your line style settings.
Not all effects or settings can be interactively worked on. Some effects do need a re-render of the complete scene, because some information about the geometry gets lost after rendering. If a parameter does not update in interactive mode, it might not be possible to update it without re-rendering the scene. In such cases, use the 3ds Max UPDATE button to regenerate the render effect.
Keep in mind that Default Edges affects all objects in the scene that do not have a finalToon material or no Local settings. Don't be surprised if every object gets the same line style!
finalToon Default Edges rollout
Load & Save finalToon Line Style
finalToon objects can have many different line style settings and combinations of different line styles effects. The combination of all line styles and effects can easily add up to several thousand of different effects per line drawn! A collection of various line styles is called finalToon Material Style (*.fts). This file type stores all the settings of all line types (Folds, Creases, etc.) along with their associated effects. This is a very powerful feature of finalToon. Other applications usually force you to rebuild materials or choose from a limited set of effects. Here you can create an unlimited number of settings that can be easily shared in a network without any hassle. These *.fts files are standard Windows files and can be easily copied around whenever it is needed.
Load - Use the Load button to load a finalToon (*.fts) Material Style.
Save - Use the Save button to save a finalToon (*.fts) Material Style.
Enable Default Edges - The Default Edges can be thought of as global in nature. Turn this checkbox on to enable the rendering of the Default edge lines. All objects that do not have Local Edges active or a finalToon material assigned will show the Default Edges.
Pattern Priority - An edge is always drawn between two faces and these two faces that share the edge might have different line styles. There can only be one line style between two faces and you can’t combine them, therefore finalToon will always choose the line style with the highest priority (1 being the highest priority). Conflicts between line styles are common and you should be aware of how to resolve this issue using the Pattern Priority spinner. If you make sure that the line style you want has a higher priority, it will be used on the edge in question.
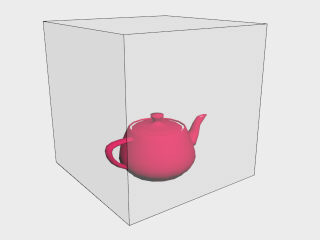
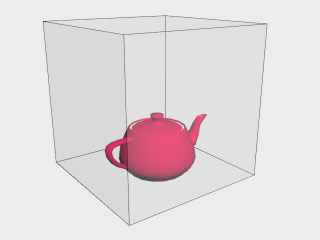
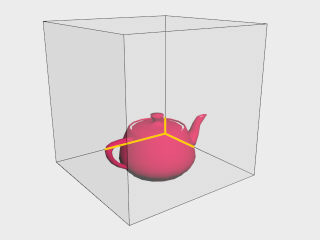
Treat Backlines as Visible - when checked, occluded lines will be drawn with the style of visible lines. See samples shown below.
|
|
|
|
Standard Rendering No Backlines |
Backlines Visible |
|
|
|
|
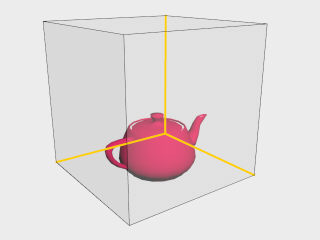
Standard Hidden Line Rendering |
Backlines Visible + Hidden Line |
Visible Fold - Check this option to enable the Visible Fold lines. The larger button to the right will bring up the Line Editor window that lets you define the specific line style and effect for the Visible Folds.
Hidden Fold - Check this option to enable the Hidden Fold lines. The larger button to the right will bring up the Line Editor window that lets you define the specific line style and effect for the Hidden Folds.
Only Silhouette - when checked, silhouette lines will be drawn, only.
Crease Edges group of controls
Visible Creases - Check this option to enable the Visible Crease lines. The larger button to the right will bring up the Line Editor window that lets you define the specific line style and effect for the Visible Creases.
Hidden Creases - Check this option to enable the Hidden Crease lines. The larger button to the right will bring up the Line Editor window that lets you define the specific line style and effect for the Hidden Creases.
Intersection Edges group of controls
Visible Intersection - Check this option to enable the Visible Intersection lines. The larger button to the right will bring up the Line Editor window that lets you define the specific line style and effect for the Visible Intersections.
Hidden Intersection - Check this option to enable the Hidden Intersection lines. The larger button to the right will bring up the Line Editor window that lets you define the specific line style and effect for the Hidden Intersections.
Self Intersection - The Self Intersection checkbox enables a special line style. Self intersections are intersections created by the same object that passes through itself. When active, the Self Intersections will show whichever Intersection option (Visible or Hidden) is currently on.
Material ID Edges group of controls
Visible Material IDs - Check this option to enable the Visible Material ID lines. The larger button to the right will bring up the Line Editor window that lets you define the specific line style and effect for the Visible Material IDs.
Hidden Material IDs - Check this option to enable the Hidden Material ID lines. The larger button to the right will bring up the Line Editor window that lets you define the specific line style and effect for the Hidden Material IDs.
User Defined Visible Edges group of controls
Visible UDVs - Check this option to enable the Visible UDV lines. The larger button to the right will bring up the Line Editor window that lets you define the specific line style and effect for the Visible UDVs.
Hidden UDVs - Check this option to enable the Hidden UDV lines. The larger button to the right will bring up the Line Editor window that lets you define the specific line style and effect for the Hidden UDVs.
Visible Angle - Check this option to enable the Visible Angle lines. The larger button to the right will bring up the Line Editor window that lets you define the specific line style and effect for the Visible Angles.
Hidden Angle - Check this option to enable the Hidden Angle lines. The larger button to the right will bring up the Line Editor window that lets you define the specific line style and effect for the Hidden Angles.
Angles Between - These two spinners let you define when a line should be drawn between two faces based on the angle range between those two faces. If the angle between two faces falls into this range, the line is drawn, otherwise it is ignored.
The File Output rollout is used for vector rendering. finalToon supports Adobe Illustrator file output (*.AI) and Macromedia Flash (*.swf), and this rollout handles all of the settings and options you may set for each file type.
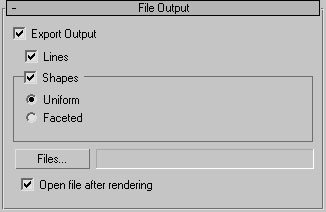
finalToon File Output rollout
Export Output - This checkbox option enables vector file output after rendering a finalToon image normally. Be careful! This option can easily become “forgotten” after you close the Render Effect dialog, so do not forget that you have enabled this option or you will always be saving an extra file.
Lines (Output) - When the Lines checkbox is enabled, vector output as *.AI or *.swf can be generated. The output file type can be chosen in the file browser dialog when selecting a name to store the file.
Shapes group of controls
The Lines option described above will output vector lines only. Activating the Shapes checkbox will also output the fill color of an object (usually diffuse color) ONLY for *.AI files. Now transforming a 3D rendering into a flat 2D vector drawing is a complex task. Adding the shapes to vector output can dramatically increase your file sizes if you’re not careful. finalToon uses advanced compression and optimization methods to reduce the file size of its final vector output. This is especially important for *.AI output even though it is not as restrictive when it comes to file size, as it is generally used in desktop publishing environments.
Uniform (Output) - Use the Uniform option to output flat cartoon color with no color change in the surface of the object itself. This type of output has the best compression possible for *.AI files for example. It does not affect *.swf files as finalToon only outputs Line Styles for Shockwave Flash.
Faceted (Output) - Check this option to enable a faceted shape output in the vector rendering. Each triangle of the object will become its own filled vector object. The number of triangles will define the smoothness of the color change in the 2D drawing, but it will also cause the vector file size to increase as well. It does not affect *.swf files as finalToon only outputs Line Styles for Shockwave Flash.
Colors (Output) - To restrict the number of vector fills in the final image (especially for *.AI output) you may reduce the Colors used in the final output through this spinner. Do not confuse this with a bitmap color reduction. The number of vector fills will be reduced and not the total colors in the final image. Similar areas of a rendering will become the same color, reducing the total number of vector fills.
Files (Output) - Click the Files button to bring up a standard Windows file browser. You may then select the output file type and give it a name. Either choose *.AI for Adobe Illustrator or *.swf for Flash compatible file output.
Open File after Rendering (Output) - Whenever this checkbox is activated, the relevant application will open up with the rendered file. When you have chosen *.swf as a file type you will see the Flash player open up with the file. If you do not wish this to happen after each rendering you need to deactivate the option.
It is recommended that you use a reasonable output render resolution to get clean and highly detailed Illustrator or Flash exports. A render resolution of 320x240 may work in some situations for Flash output and in rare situations for AI output. A minimum resolution of 640x480 is suggested.
finalToon enables you to mimic many drawing styles that can even look like real hand drawn paintings. To enhance this effect, you may add a canvas to your rendering. Any image may be used as a structure to paint on, however real structures like paper or linen make the effect look really cool.
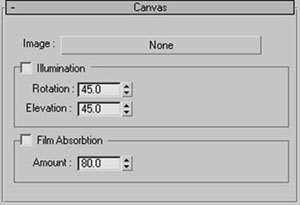
Image (Canvas) - Click the button labeled None to bring up a standard Windows file browser to choose a bitmap image file for use as the canvas texture. Any legal image file type or image will work; however, we suggest that you use images that are usually good for bump map effects and have good contrast between light and dark areas.
Illumination group of controls
Activating this checkbox turns on the canvas bump effect for a finalToon rendering.
Rotation (Canvas) - Adjusting this spinner will rotate the virtual light source around the canvas bump effect. This works like a bump effect. You define where the pseudo-shadows fall.
Elevation (Canvas) - This defines the bump amount of the structure effect. Higher values will enhance the effect, lower numbers will reduce it.
Film Absorption group of controls
Activate this checkbox when you want to create an ink blending effect. This effect simulates the absorption of wet ink into the paper.
Amount (Canvas) - The Amount spinner lets you control how strong the absorption effect should be. This value affects the lines only.