finalToon comes with several texture maps that allow you to do things that no other package can offer. A great example is the finalToon Hatching texture map that offers bitmap-based procedural hatching functions. This is a great feature to even enhance the NPR (Non-Photorealistic Rendering) look of an image.
finalToon offers true parametric vector Hatching! This procedural type of hatching patterns allows you to do even more creative hatching with a much higher image quality than before.
Stroke Style
Hatching Map - check this option to use a bitmap to control the hatching pattern
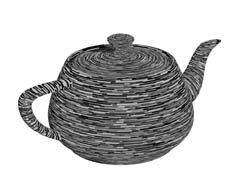
Stippling - when checked, a density based dot-pattern will be used to draw the surface. This can be used to reproduce an old style comic print look.
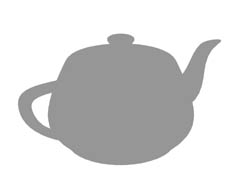
Points - uses a regular point pattern to draw the surface
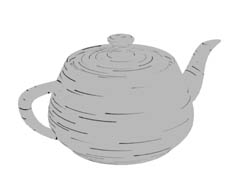
Vertical Lines - when checked, a vertical pattern of straight lines will be drawn
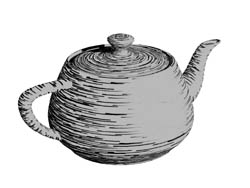
Horizontal Lines - check this to draw horizontal lines all over the objects surface.
Find below the Hatching styles in their default modes:
 |
 |
|
Stippling |
Points |
 |
 |
|
Vertical Lines |
Horizontal Lines |
Stroke Mask (Hatching) - The finalToon Hatching texture map uses a bitmap as the base for its procedural hatching on an object. A stroke map should have at least an alpha channel that defines the stroke and also the transparent areas. This bitmap will be used in the procedural hatching generator. Use the display button to bring up a picture viewer showing the current stroke map.

Hatching Effect Stroke-Bitmap
Map Size (Hatching) - The Map Size spinner controls the overall size of the bitmap being used as the hatching stroke. As the value gets bigger, the relative size of the individual hatching bitmap will get smaller. Note: Usually you will set the map size in multiples of 2 (32, 64, 128, 256, 512, etc.).


Map Size = 256 Map Size = 512
Stroke Size (Hatching) - The bitmap being used as the hatching stroke usually also specifies the size of the individual strokes. Sometimes it may be necessary to shrink or scale the stroke bitmap to get more or less strokes from the hatching bitmap onto the object. Use this spinner to scale the bitmap of the stroke.

Stroke Size = 100 Stroke Size = 50
Shading Steps (Hatching) - This parameter defines the shading through the hatching stroke. Higher values will result in a more visible light to dark transition and contrast. Increasing this value will also increase the render time and memory consumption. For example, 8 shading steps will create 8 individual hatching bitmaps of the size as defined in the Map Size spinner.

Shading Steps = 4 Shading Steps = 16
Stroke Color group of controls
This group of controls lets you determine what color the Hatching strokes will be and contains three radio buttons for you to choose from. Be aware that only one choice can be made for the stroke color.
From Mask (Hatching) - The hatching stroke may be used as a mask only, or it may also supply the color information for the hatching effect. Check the From Mask option to use the RGB information of the stroke bitmap for the color of the hatching itself.
Stroke Color Swatch (Hatching) - Use this color swatch to set a specific stroke color to be applied to the hatching stroke.
Stroke Color Map (Hatching) - A third method to define the stroke color is to use any standard texture map (procedural or bitmap) to supply the color value for the hatching stroke. To do this, use the relevant texture slot button.

Stroke Color Noise Map No Stroke Color Map
Stroke Fading group of controls
Stroke Fade Out (Hatching) - The Fade Out method blends the hatching patterns together into the object’s material. The stroke patterns are procedurally generated and then the hatching map is composited on top of the Diffuse color of the object.

Stroke Fade Out Active Threshold = 0.5
Threshold Fade Out (Hatching) - The Threshold option provides another way to control the blending of the hatching pattern by using a fixed threshold value. All colors with an intensity below this threshold value will be treated as 100% transparent.
Crossed Strokes group of controls
Crossed Strokes (Hatching) - Activating this checkbox lets you apply a crisscross hatching rendering effect to your finalToon object. The illustrations shown below displays the effect.


Crossed Strokes Off Crossed Strokes = On
Position (Hatching) - The Position spinner defines the areas that should get the crisscross hatching effect on the object’s surface. Most often you want the crisscross effect in the shadow areas of your object to enhance the shadow area with a higher density of strokes. A position of 0.0 is equivalent to turning the effect off. A position value of 1.0 will use crisscross hatching in all areas of the object, both lit and shadow. The default value of 0.5 will use the crisscross hatching only in the darker areas.


Position = 0 Position = 0.8
Stroke Density group of controls
Density (Hatching) - The Density spinner controls the number of strokes per UV area. Higher density values will result in more strokes on the object’s surface. This spinner can go above 100%.

Density = 10 Density = 100
Min Level (Hatching) - Use the Min Level spinner to set the minimum density of strokes to be used on an object’s surface. A Min Level of 0.0 will create no strokes at all in bright, highlight areas. Increase this value to get more visible hatching strokes also in brighter areas.

Min Level = 0 Min Level = 50
Max Level (Hatching) - The Max Level spinner controls the maximum density of strokes that can be achieved on the object’s surface. Lowering this value will make the dark areas get a bit lighter, until a value of 0.0 where all strokes disappear.

Max Level = 0 Max Level = 100
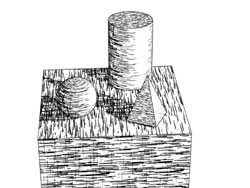
Shadow Decay (Hatching) - The Shadow Decay spinner value is used to produce darker, more pronounced shadows which will result in a higher contrast image. As you can see in the illustration below, the shadow of the object is far blacker with a 100% Shadow Decay. The minimum value is 0.1 and this will result in a flat looking shadow area, while higher values will cause the shadows to be more pronounced.
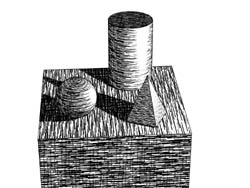
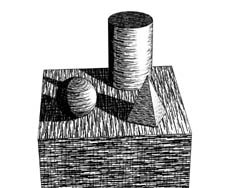
Shadow Decay = 0.1 Shadow Decay = 100 (notice the cylinder)
Light Rise (Hatching) - The Light Rise spinner does the opposite of the Shadow Decay setting. Increasing this value will result in a brighter object as midtones will gradually become as bright as the current highlights. As shown in the illustrations below, a value of 100% will result in a high contrast change between illuminated and shadow areas.
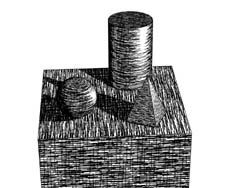
Light Rise = 0.1 Light Rise = 100
Stroke Homogeneity group of controls
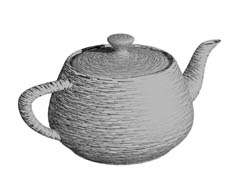
U-Axis (Hatching) - finalToon handles strokes in several ways. One aspect is the regularity or homogeneity of a stroke along its U-Axis and V-Axis. The U-Axis spinner lets you control how the hatching stroke is repeated in a regular way. The area of the object’s surface looks much more homogenous to the user when the value is higher. Depending on the stroke pattern, there will be either more or less strokes in the U-Axis based on this value.

U-Axis = 0 U-Axis = 100
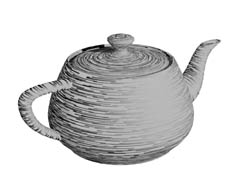
V-Axis (Hatching) - finalToon handles strokes in several ways. One aspect is the regularity or homogeneity of a stroke along its U-Axis and V-Axis. The V-Axis spinner lets you control how the hatching stroke is repeated in a regular way. The area of the object’s surface looks much more homogenous to the user when the value is higher. Depending on the stroke pattern, there will be either more or less strokes in the V-Axis based on this value.

V-Axis = 0 V-Axis = 100
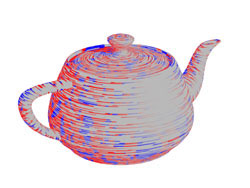
Rotation (Hatching) - The Rotation spinner controls how much the hatching stroke is rotated from its original UV orientation. A Rotation value of 0% will rotate all strokes with a completely random value, while a Rotation value of 100% will not rotate the strokes at all. As you can see in the illustration below, with 100% Rotation all strokes are evenly aligned.
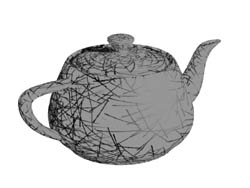
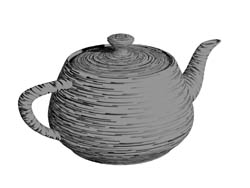
Rotate = 0 Rotate = 100