These tutorials are designed to get you up to speed with finalToon in a sequential way. Each tutorial builds on the skills that you learn in the previous lessons, so you should try to do them in order.
One other thing worth noting is that these tutorials follow the material that is presented within the video training materials on the CD. (Note: If you purchased finalToon as an electronic download – you can download the video materials separately from the web installer.) We recommend that you watch this instructional material before going through the written tutorials as you'll get an idea of how quickly you can begin working with finalToon. Additionally, the narrator for these videos is cebas President Edwin Braun, who gives you some extra insights into the reasons finalToon works the way it does.
First Steps
In this first tutorial, we’re going to introduce you to a number of the basics involved with using finalToon including creating and applying Line Styles. We’re going to start off with some very simple shapes to use.
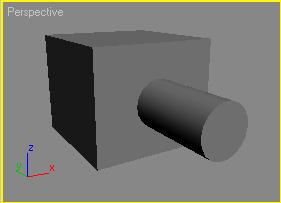
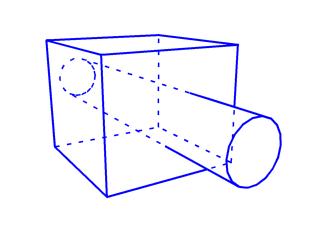
In the Top viewport, create a box approximately 50 units in all dimensions.
Next, from the Front viewport, create a cylinder with a radius of 10 and 130 units in length, then position it so that it extends out from both ends of the box as shown in the figure below.
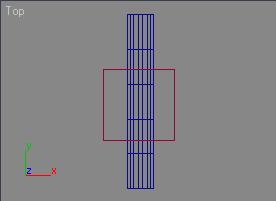
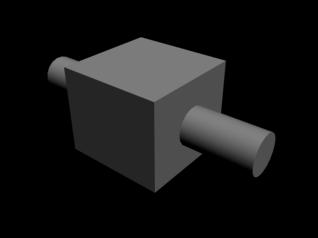
Now in the Perspective viewports, adjust the view so it approximates the following figure.

Open the Material Editor and assign a single Standard material to both the box and the cylinder. Then close the Material Editor.
Now lets render the scene.
As you would expect, you now have a very dull scene. But that’s about to change. The first thing we need to do is change the background color so that the finalToon lines we create will be seen.
From the main 3ds Max toolbar, select Rendering > Environment... Make the Background Color swatch pure white (RGB: 255, 255, 255).
Now that you've changed the background let’s go ahead and add finalToon to your scene.
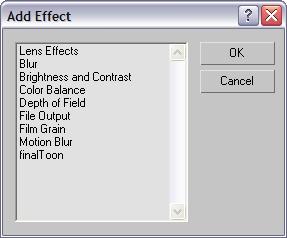
Select Rendering > Effects... This will bring up the Render Effects dialog.
From this dialog, click Add, choose finalToon from the list of options (as shown in the figure below) and then click OK to add it to your list of active effects.
At this point, finalToon is now active in your scene, and will render its Line Styles. However, let’s take a moment to find out how to control your line styles.
Open the Default Edges rollout.
Here is the heart of finalToon’s Line Styles. This is where you will spend time creating and tweaking line styles to meet your needs. finalToon offers you a total of 6 different line types (with multiple options inside of each). By default, the checkboxes beside the Visible Folds, Visible Creases and Visible Intersections should be active.
Turn off (disable) the Visible Intersections and Visible Creases checkboxes, so that all that remains active is the Visible Folds.
Render the Perspective viewport.
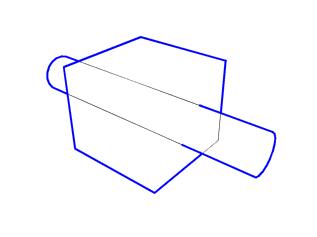
finalToon adds a thin, black outline around the borders of the object. That’s because the Visible Folds option looks for those places on the objects where you have an edge that shares a visible and non-visible face (via their normals). Where the faces “fold” away from the viewport and an edge exists, such as along the side of the box, a line will be drawn.
Next let’s take a look at how we can control the look of the Visible Folds.
Click on the button next to the Visible Folds checkbox labeled default 1.
This will open up the Line Editor, and it is here where you can control what each line type looks like.
Within the Basic Parameters rollout, adjust the Thickness spinner to 4.
Re-render the Perspective viewport.
Now let’s change the way the finalToon handles the shading of the objects in our scene.
Close the Line Editor window by clicking Close (at the bottom of the dialog).
From the Render Effects dialog, open the Global Settings rollout.
Under the Shapes Color group of controls, select MAX Background.
Render the Perspective viewport.
This time, the objects end up turning completely white when the finalToon lines are drawn, making it look like it was only a line rendering. An interesting side note here is that if you look at the Alpha channel that is created in your new rendering, you’ll notice that it shows the lines only and is not solid as you might expect.
Of course, all of this re-rendering is going to get time-consuming, especially as you get into more complex Line Styles. Changing settings over and over would become quite repetitive. Fortunately, finalToon can significantly speed this creation process up.
Scroll to the top of the Render Effects dialog, and within the Preview group of controls, enable the Interactive checkbox. This will force an immediate re-rendering of your scene and leave the display up.
As finalToon is a Render Effect, it can take full advantage of the interactivity within 3ds Max. Now let’s get back to editing our Visible Folds Line Style.
Click on the default 1 button next to the Visible Fold line type. This will bring up the Line Editor again for the visible folds.
At the very top of the Line Editor window, change the Style Name from default 1 to Thick Line Blue. If you move the Line Editor window so it isn't covering the Render Effects window, you'll see that the name next to the Visible Folds option has changed to reflect the new name.
Next, within the Color group of controls in the Line Editor, change the color swatch from black to blue (RGB: 0, 0, 255). Notice that your rendering updates to reflect the color change immediately.
Close the Line Editor dialog.
Now we’ll make some other changes to our line types.
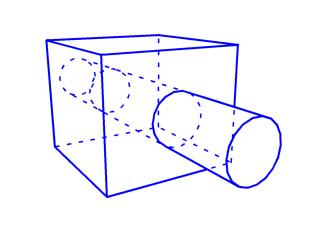
Activate the Hidden Folds checkbox within the Default Edges rollout.
The scene re-renders automatically, but nothing happens. Actually, there are several situations where finalToon will require a full re-rendering in order to update its effects. Activating unused line types is one of those cases. Why? Because the information for those line types was not calculated by finalToon on the original render, and must be recalculated in order to show up. However, if you've rendered with multiple line types active, you can quickly turn the individual types on and off and get full interactivity.
From the Render Effect dialog, click Update Scene to re-render the scene.
Click on the default 2 button that is connected to the Hidden Folds line type to re-open the Line Editor.
First, rename this new line style hidden line, and then change it’s color from black to blue (RGB: 0, 0, 255).
Within the Basic Parameters rollout, choose ‘Dotted’ from the Pattern pulldown menu.
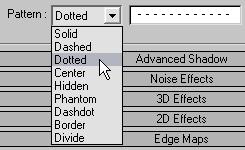
As you can see from the interactive update, the hidden lines now take on a dotted pattern, and our rendering begins to take on a technical illustration look. Let’s examine the pattern a bit more.
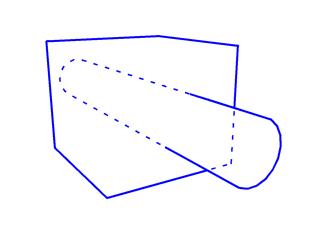
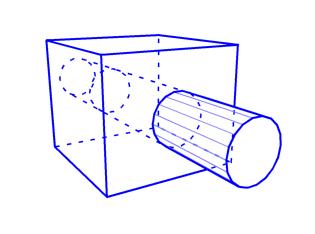
Change the Perspective viewport to hide the back part of the cylinder almost completely, as shown in the figure below.
From the Render Effects dialog, click Update Scene to re-render the scene.
In order to focus on the dotted line pattern, within the Line Editor change the Thickness spinner to 3.
On the next update of your rendering, you’ll see that the area around the far end of the cylinder, the pattern bunches up, and it destroys the illusion of a 2D drawing.

But finalToon has the ability to overcome this limitation.
To fix the unusual bunching of the pattern, within the Line Editor for hidden line, activate the Connect Lines checkbox in the Basic Parameters rollout.
Again, nothing seems to happen to the update. This is another case where finalToon requires a full scene update to take advantage of this feature.
Click the Update Scene button to render the scene again.
When the scene is finished, you can see that the unnatural bunching has been resolved. This is due to the ability of finalToon to normalize all of the edges it puts a line over through the “Connect Lines” option. This is a simple, but very powerful feature that you’ll use over and over again.
Now that the pattern has been corrected, let’s change the Thickness of the Hidden Folds back to 1 through the Line Editor, then close that dialog.
Back within the Render Effects dialog, enable the Visible Crease checkbox, and then click Update Scene to view the new line type.
Crease lines are determined by smoothing groups within your objects, and it will draw a line on the edges wherever a change occurs. This can be handy for adding quick detail to objects like spaceship hulls. Simply apply a couple of different smoothing groups to the body of your model and turn on Crease lines. Voila! Instant hull plating.
Now let’s say that you want to match the existing line style of the Visible Fold. Simply drag and drop the Thick Line Blue swatch down to the Visible Creases option (drop it over the button labeled default 3).
Choose Instance from the resulting dialog.
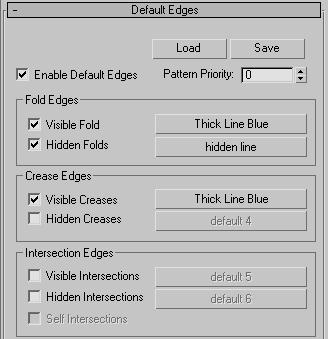
You now have two Line Styles that are connected and any time you make a change to one of them via the Line Editor, you will affect both simultaneously. Your Default Edges rollout should look like the following image:
Repeat steps 35 – 37 for the Hidden Creases – dragging the hidden line swatch and replacing default 4. When you have completed this step, your rendering should resemble the following image.
Next, activate the Visible and Hidden Intersections checkboxes and hit Update Scene.
As you can see, the Intersection line type looks for places where two objects touch or pass through one another. This is a very handy option as well as the only way to grab edges that exist between two objects.
As before, drag and drop the Thick Line Blue Line Style to the Visible Intersection swatch and the hidden line Line Style to the Hidden Intersection swatch. Your results should look like the following image.
Activate the Visible Angles checkbox to turn on the Angle Edges.
Angle Edges are determined by the angles of the faces between an edge, and this is a great way to show how an object is constructed.
In order to keep some differences within our Line Styles, this time drag and drop the Thick Line Blue swatch down to the Visible Angles, but choose Copy this time so you can alter it’s appearance independently of the original or its instances.
Adjust the Angles Between spinners so they read 15 and 60 respectively.
What the Angles Between spinners mean in this case is that for all edges where the two faces that share it fall within a 15 to 60 degree angle of one another, finalToon should draw a line along that edge.
Click Update Scene to view your results.
Re-open the Line Editor for the Visible Angles and adjust the line thickness to 2. This will help separate it a bit from the thick edges of the outlines. If you want, you can also fade the Angle lines by adjusting the Opacity spinner for the Lines to 50. At this point, your image should look like the following image.
Save your scene fT_linestyles.max.
Now that you've had a taste of what finalToon can do with Line Styles, spend a bit of time experimenting with different combinations of patterns, colors, thicknesses and line types to see what kind of looks you can come up with.
In the next tutorial, we'll cover a bit more on Line Styles as well as beginning to go deeper into finalToon and it's materials.