BulletPhysics

thinkingParticles ships with multiple physics solvers and there are three to choose from. Some solvers are better in certain situations than others, thinkingParticles' native solver "Shape Collision" is used on high-end movie productions when quality and accuracy of collisions are more important than simulation times. On the other hand PhysX is more often used in game productions were simulation accuracy is not that important. BulletPhysics offers the best compromise of both worlds accuracy and speed, even so it is not as accurate as the one found in the "SC" solver.
While it is possible to use multiple physics solvers in a DynamicSet, it is highly recommended that you use as few operators of this type as possible. The memory requirements are huge and they increase with each addition of that operator type.
Because of the academically challenging nature of the subject matter, it is assumed that you have at least some basic knowledge of computer based physics and dynamic simulations. If not, it is recommended that you get hold of a good book and familiarize yourself with the concepts of computer based physics simulations.
Operator Inputs
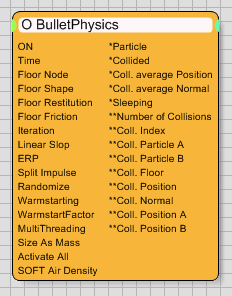
ON - (Bool) This input data
stream determines whether the operator is considered 'on' or 'off'. You
can connect other operators to this input channel such as a Bool
Helper to activate/deactivate the whole operator.
Time - (Time) This input data stream is used to define the local
time for the operator when the user wants to override the default system
time.
Floor Node - (Node) This input data stream is used to specify
through a node helper for example a 3D mesh as a floor collision object.
A floor object is automatically treated as immovable with an infinite
mass.
UI Control Parameters - those input data streams are the equivalent
of the UI controls, keep in mind that there is no visual indication that
an operator is connected to any of those inputs! It might be needless
to adjust a value if it gets overwritten by a connected operator.
Operator Outputs
Particle - (Particle) This
output data stream supplies the current particle information. Use this
to modify specific particle properties.
Collided - (Bool) Whenever a collision event occurs, this
output data stream will return true as its value. In all other non-colliding
situations, the output will report false as the value.
Collision Average Position - (Position) This output data stream
provides the current interpolated collision point.
Be aware that this point may be highly inaccurate as face to face collisions usually happen on areas and not at one individual point. Also, when objects come into contact and start sliding, the collision point will be generated at all times over and over again.
Collision Average Normal
- (Normal) This output data stream outputs the interpolated normal of
the calculated collision point.
Sleeping - (Bool) This output data stream holds the frozen status
of the particles, as determined by the parameters set forth in the particle
group rollout. When particles are considered "frozen" or "inactive",
this value will be true. When particles are actively moving, this value
will return false.
Double Star = Secondary Initiator Outputs
Double Star Output (**) behaves like the Top-Level Initiator outputs,
this outputs activate connected nodes for evaluation. It is important
to understand that all connected nodes will be evaluated. However, as
this is a secondary Initiator output, it can not be combined with the
Top Level Output at the same time. The main rule still applies: Never
use 2 Initiators on the same node or wiring.
Number of Collisions - (Integer) holds the total number of all
collisions that happened for a particle. A collision may happen multiple
times, especially with sliding objects (surface - surface). Note, this
is a secondary Initiator output that can not be combined
with the top level Initiator outputs at the same time. Either the Top-Level
will be active or the low level department but not both at the same time.
Coll Index - (Integer) outputs the current index number of the
collision. This might be used to get the current progress of the collision
evaluation. Collision index can become as big as the Number of Collisions
value, if this is reached the collisions are done.
Coll Particle A - (Particle) outputs the particle A of the collision
pair. This output is always evaluated before particle B!
Coll Particle B - (Particle) outputs particle B of the collision
pair.
Coll Floor - (Bool) when a collision with the floor object happens,
this output will be set to True.
Coll Position - (Position) outputs the real world position Collision
point.
Coll Normal - (Normal) outputs the normal of the calculated collision
point.
Coll Position A - (Position) outputs the collision position of
Particle A in local object space.
Coll Position B - (Position) outputs the collision position of
Particle B in local object space.
Rollout Menu

The BulletPhysics operator is
used to control the physics solver parameters. The settings you
find within this menu are "global" settings those settings would
affect the overall simulation.
Particle
Group - this drop-down list
selects the particle collision partners for the floor or inter-particle
collision.
All Physics based parameters are set and controlled within the particle group itself. Select the relevant particle group in the particle group tree view to access the dynamic properties of a particle group.
Deflector - is used to choose the deflector objects. Important: those objects will be treated as unyielding, all the time, regardless of their local physics settings. One application would be to use recorded particles as deflectors.
IMPORTANT
Deflector Particles will use the physics settings from the Floor controls.
Floor

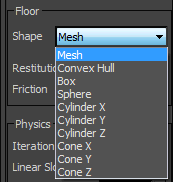
Shape - defines the shape of the collision object used for the floor. There are 10 options to choose from, two was the one that fits closest to the object type used as floor.
Mesh
- select this option to define the floor object as a mesh object.
Convex Hull - select this optimized
version when the floor object represents a convex mesh.
Box - choose this option to use
the highest level of optimization when the floor resembles a box shape
Sphere - select is option when
the floor object is also a spherical shape.
Cylinder X,Y,Z - to optimize the
floor collision with cylindrical objects choose either X,Y or Z.
Cone X,Y,Z - for optimum collision
detection with cone shaped objects, choose this option.
Restitution - Use this parameter
to control the bounce value between the floor<->particle collisions.
Higher values will make the particles lose less energy per bounce. Be
aware that values greater than 100 will create extra energy and the particles
will gain energy with each bounce.
Friction - This spinner defines the friction between particles
and the floor when they are in contact (sliding). Higher values will make
the particles slide less.
Physics
Iteration - sets the number of sub-steps to be used to estimate the real collision point of colliding objects. The lower this number, the faster the simulation will run. However, lower values would also mean less accurate results. In most situations, you can keep this value between 5-10, while in exceptionally complex scenes, you can try to set a value as high as 30 to get more accuracy.
Linear Slop - Defines the penetration depth for object collisions. this value is measured in world units. A value of 1 equals to 1 unit penetration depth (overlapping). It is recommended to use the default value of 0.
ERP (Error Reduction Parameter) - use this parameter to adjust possible errors in a joint setup. When a joint attaches two bodies, those bodies are required to have certain positions and orientations relative to each other. However, it is possible for the bodies to be in positions where the joint constraints are not met. This ``joint error'' can happen in two ways:
If the user sets the position/orientation of one body without correctly setting the position/orientation of the other body.
During the simulation, errors can creep in that result in the bodies drifting away from their required positions.
Split Impulse -
by default, Bullet solves positional constraints and velocity constraints
coupled together. This works well in many cases, but the error reduction
of position coupled to velocity introduces extra energy (noticeable as
'bounce'). Instead of coupled positional and velocity constraint solving,
the two can be solved separately using the 'split impulse' option. This
means that recovering from deep penetrations doesn't add any velocity
when this option is checked.
Although this removes most of the extra energy/bounce, it degenerates quality
a little bit, in particular for stable stacking. Hence, the setting should
be disabled. Also note that the split impulse option is only enabled for
contact constraints, and none of the other joints (hinge/ball socket and
so on), for quality reasons
Randomize Constraints Order - check this option to enhance "stacking" situations. Bullet solves constraints one constraint row at a time. By randomizing the order of solving the constraint rows, stacking stability can be improved (at the cost of a little bit of performance)
Warmstarting - Bullet uses an iterative algorithm where each iteration is based on the solution of previous iteration. If no warmstarting is used, the initial solution for Bullet is set to zero each frame. When using warmstarting, the first iteration uses the last solution of the previous frame. This improves convergence towards a better solution and hence stacking stability.
Factor - defines how much of the previous impulse is used for the next calculation step. A value of zero will turn off warmstarting a value of 1 will use the original value.
Multithreading - when checked some parts of Bullet will use multi-threaded code to speed up collision.
Size As Mass - Activate this check box to enable an automatic mass calculation that is based on the size of the particle. For example, a particle with a size of 2.0 will be treated as 2 Kg.
Wake up Sleeping Bodies - whenever this option is checked (animated) all sleeping objects (out of any physics simulation) are turned active again.
Soft Body
Air Density - defines how much friction between air and objects should be considered in the physics simulation process. Higher numbers will create more "tumbling" like behavior on free fall simulations.
Recorder
thinkingParticles allows you to record particle dynamics. It is always
a good idea to use this feature whenever a simulation seems to be perfect
for the job. Recording the particles as they bounce around will make life
easier at a later rendering stage. Playback from hard disk is also usually
much faster than calculating the solution each time you play back the
particle collisions, especially considering time line scrubbing.
Select Record File - Click this button to bring up a standard
Windows Save dialog. Any legal name and path can then be specified to
save the recorded particle simulation.
Simulate, Play, Record - These buttons are fairly self-explanatory.
The Simulate button turns the recorder into playback
mode and will play back the recorded file on hard disk as you scrub the
3ds Max frame slider in the view ports. The Record button
will switch the recorder into record mode. With the record button pressed,
clicking the Play button on the 3ds
Max time line will start the recording and simulation of the
particle dynamics. After the last frame has been reached, the recording
automatically stops and turns into Play mode to show you the results.
Active Time Segment / Range - This is a standard 3ds Max control
that lets you choose whether you want to record the entire particle animation,
or just a specified range of frames as defined within the two spinners.
Redraw Views - when checked, the 3ds Max view ports will be updated
while simulating. Depending on scene complexity it might be a good idea
to turn of View Updates while simulating.