Table of Contents
Right Click Menu Options
thinkingParticles uses standard methods to navigate and manipulate the software and its parameters. All mouse buttons are used in a natural and logical way as every user should know from any Windows application. In addition to the standard “point and select” approach, extra functions can be invoked, by using a keyboard shortcut along with the mouse controls.
Grid View Area

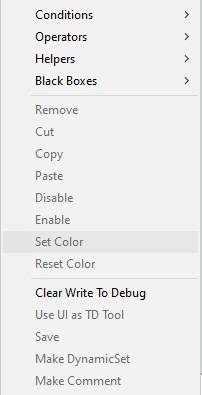
A right click onto the empty grid or DynamicSet view area will bring up the above context menu. It allows for fast access to all operator creation functions. Instead of using the Create Rollout Menu section to the right of the main view, the right click menu represents a much faster method in creating thinkingParticles' Nodes.
With a thinkingParticles Node selected, before right clicking into the empty background grid, different options will become active. As shown in the illustration below, the Cut, Copy or Paste options are available.
Note:
The Cut, Copy and Paste options will be available only, when at least one thinkingParticles' Node is selected (active!)
Clear Write To Debug - when selected, all ports marked for debugging output will be removed or cleared from debugging.
Use UI as TD Tool - choose this option to “transfer” the user interface of the selected node(s) to the TD-Tool section. This will also remove the User interface from the main TP rollout menu section!
Save - chose this option to save the selected node(s) to the BlackBox folder, or any other place you prefer.
Make Dynamic Set - check this option to create an extra Sub-Dynamic Set out of the selected tP Nodes.
Make Comment - this option becomes active when one or more nodes are selected. Choosing this option will create a comment frame around all selected notes and enable you to type in comments.
Post Cache - this option turns the DynamicSet and its dependent Sub-dynamic sets into Post Cache dynamic sets. This special mode is flagged by a yellowish tint of the background grid. To learn more about Time Independent caches click HERE
Important:
Post Cache Dynamic Sets are only meant to work below a Time Independent cache file. If there is no TI cache file present the whole dynamic set will not be evaluated at all!
Node Area

Right Clicking onto any node in the DynamicSet view will bring up the dialog as shown above. The context sensitive menu will enable or activate Menu options whenever possible.
Disable - select this menu option to disable a thinkingParticles' Node. Disabled Nodes will not be evaluated at playback or simulation time.
Rename - when selected, you can rename the Node.
Selection Sets
thinkingParticles offers the option to organize nodes in selection sets for easier manipulation and arrangement on the DynamicSet Grid.
An existing Selection Set is indicated by brackets that highlight whenever the mouse hovers above the root node of the Selection Set.
The root node, holding a selection set can be easily identified by a 'White Dot' drawn at the top center of the thinking particles Selection Set root node.
Dynamic Set selections are created, by first deciding on an anchor node and then 'connecting' other selected nodes to it. A typical selection set creation process would look like this:
- You select nodes you want to group
- Then you right click on the Title of the dedicated root Node of the selection set
Selection Replace - choose this option to replace an existing selection with a new selection.
Selection Add - this option adds the selected nodes to the Node where the right click is initiated. (see GIF animation above)
Selection Remove - check this option to remove the selected nodes from the selection set
Selection Clear - when selected, all nodes connected to the root node will be removed form the selection set.
Connect from Input - use this menu, when connecting ports in expert mode or high zoom levels.
Connect from Output - use this menu, when connecting ports in expert mode or high zoom levels.
Disconnect Input - lets you disconnect any Input from a list of ports.
Disconnect Output - lets you disconnect any Output from a list of ports.
Disconnect All - when selected, all ports are disconnected from the node.
Input Visibility - lets you make any Input port visible.
Output Visibility - used to make any Output port visible.
Copy Data From - this menu entry allows you to select any other identical thinkingParticles Node and transfer its complete settings. You will only see an entry, when there is another identical Node somewhere in a DynamicSet.
Port Area
Right clicking on any port (click onto the port name) allows you to hide or add the selected port to the debug output. It is important to understand that every output can be marked for debugging, however, to remove a port from debugging, the port needs to be right clicked again, as well.
DynamicSet Tree View
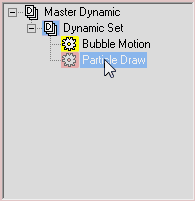
Right clicking onto any element Name will disable the relevant node or the whole DynamicSet. An indication of a disabled node or DynamicSet will be that it is grayed out. This is perfect for debugging purposes, or when a DynamicSet is seen as complete, or when other areas need to be worked on, without the need of processing the disabled DynamicSet as well.
Right Click on Icon
When an icon is right clicked, a special DynamicSet related menu is opened. Every DynamicSet may be recorded individually. To learn more about using cached particle simulations, please read the chapter about Working with tP cache files.
As shown above, controls to set or create cache files, along with statistical data, are displayed in the right click menu.
Cache Stop/Play - choose this option to disable or enable a cache playback.
Cache Time Independent - this option allows you to turn the cache into a time independent cache. To learn more about Time Independent caches click HERE
Cache Play Backward - when selected, the cache is played back in reverse.
Group Change Stop Tracking - allows you to bring back the old cache behavior. Pre-Subscription Drop 10 versions did continue tracking cached particles when a particle group change happened. Since Drop 10, a group change will always disconnect the particles, and no more tracking from the cache will happen.
Cache Record - starts the cache recording to hard disk.
Cache Record Hierarchy - select this option to bring up the file cache Hierarchy dialog.
This dialog will display the DynamicSet file caching hierarchy as seen from its selected level (DynamicSet). To visualize all available file caching DynamicSets within a thinkingParticles system; right click the MasterDynamic icon and choose Cache Record Hierarchy from there.
In the example above you can see a total of 3 levels with dependent caches. The top level DynamicSet:Reborn is dependent on the DynamicSet:Shape and this is dependent on the DynamicSet:SmokeBase. A dark red bar indicates that the DynamicSet is selected and Invalid (the setup has changed since the cache was created), a light red indicates an invalid DynamicSet cache file that is not selected in the tree-view. Shades of green color indicate the file cache is valid and has not been changed.
In bigger projects cache dependencies can grow and become tough to handle; this easy to use interface offers you a centralized view of the available cache files and their status. Chains of particle cache files can be easily rebuild with one button click.
Active - press this button to rebuild all active cache files
Invalid - press this button to rebuild only the invalid and dependent cache files.
Selected - press this button to rebuild only the selected cache files.
Cache Write Channels - lets you select the information that will be stored in the particle cache file. Depending on the particle setup; it may be advantageous to only save the minimum amount of data to radically reduce the file size of the cache file. Every set of information is stored per particle and so it easily adds up to great amounts. In many situation you would only need Position and maybe velocity.
Cache Read Channels - when loading particle caches the data needed can also be chosen. This menu will automatically present any available data channels in the cache file.
Cache Unset - removes the assigned cache file.
Set Cache/File name - sets or displays the current file name of the active cache file.
Save Material - choose this option to re-save the DynamicSet materials that usually go along with each cache file. This should be performed after updating materials in the 3ds Max scene for any objects that are picked in Obj2Particle or GeomInstance operators. Before using this function, please set the cache to Stop, then use this function, then set the cache to Play.
Extract Particle Group Hierarchy - when checked, the original particle groups and hierarchies are re-created in the Particle Group Tree view to represent the particle groups within the cached DynamicSet.
Statistics - displays the statistics about the cache file.
Particle Group Area
 New Particle Group Right Click Menu Option: Right-Clicking on any particle group name brings up an new context sensitive menu.
For each particle group name clicked; a list of operators using or referencing this particle group is listed. Clicking any of the Operator names will automatically bring up and select the DynamicSet in question.
This feature is great for debugging complex DynamicSet setups containing hundreds of nodes.
©2024, cebas Visual Technology Inc.


