Table of Contents
Making a TD-Tool Fountain Particle System
The TD-Tool in thinkingParticles is a powerful new feature of Release 3 and here in this tutorial you are going to learn how to use this new tool to your advantage and create even more complex databases of your own pre-made particle systems. The specific goal is to create a water fountain particle system that can be easily created by dragging in the view port. Gravity and some other easy controls should be exposed to the user. All other complex wiring tasks or other settings should not bother the end user in this example.
What is a TD-Tool ?
A TD-Tool can be imagined as an enhanced thinkingParticles Black-Box system. However, TD-Tool setups have more control and offer features that can not be achieved by BlackBox setups. Every TD-Tool setup can have its own standard 3ds Max user interface with simple controls. You may also create a TD-Tool setup that allows you or other animators of your work group to simply create complex particle systems and control those without any knowledge of thinkingParticles and the wire setup.
Step 1
This tutorial assumes you have finished all previous tutorials and 3ds max is freshly started and initialized with a new and empty scene. To do this Reset or restart 3ds Max.
Go to the Command panel → Create → Particle Systems → Thinking and place a thinkingParticles icon in the Front view. The actual position of the TP Node does not matter at all.

thinkingParticles in the Create Command Panel
Press the Properties button to bring up the main thinkingParticles user Interface
Step 2
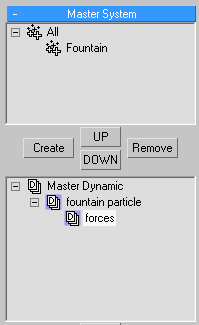
Create One Particle group called Fountain. This Particle group will be used to store the fountain particle and it will also ensure that the gravity only affects the fountain particles.
As shown in the illustration above, create two DynamicSets one “fountain particle” DynamicSet and another nested one called “forces”.
Step 3
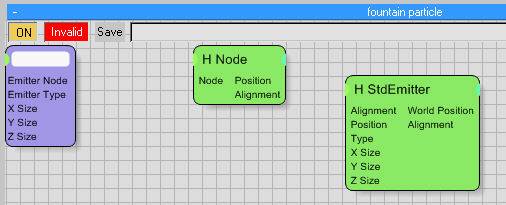
Now, its time to create some operators in the “fountain particles” DynamicSet.
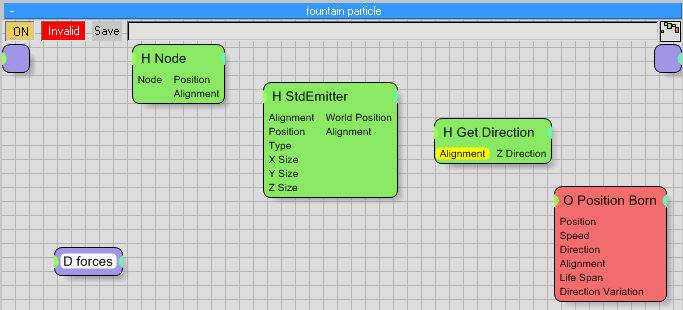
Create the following Nodes as shown above
- Helpers/Standard/Node
- Helpers/Position/StdEmitter
- Helpers/Standard/Get Direction
- operators/Generators/Position Born
Make sure you set the PositionBorn node to emit particles into the Fountain particle group! We want to make sure we are creating a self contained DynamicSet and all particle forces or other effects only affect “our” particle system and not others that might also create particles in the all group for example.
Step 4
To create a TD-Tool that has its own User interface and can be created by standard 3ds Max drag and drop methods we must specify an emitter type. If we would not specify the emitter type for the DynamicSet we would not get a button to create one or more self contained particle systems.
Select the “fountain particle” DynamicSet in the left hand Tree-View. This will bring up in the rollout menu section of thinkingParticles the DynamicSet controls for the selected DynamicSet on the right.
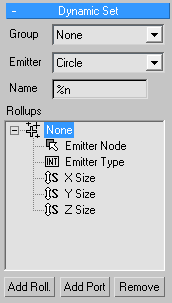
Choose Emitter: Circle. This option will allow you to drag and draw a circular helper objects into the modeling view port or 3ds max whenever a thinkingParticles helper Node is available. As shown below, choosing an Emitter-Type will automatically add ports to the DynamicSet input area as well as ports are added to the Rollups control.
Step 5
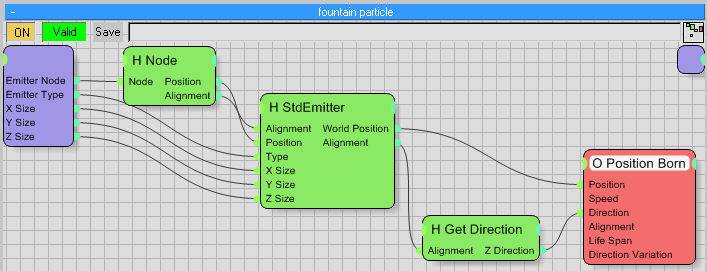
Connect the ports as shown above. There are a few notable connections that need to be created, to make this TD-Tool work as intended.
Creating or specifying an Emitter-Type is not enough to actually make the particles appear at the position the user draws the circular helper object in the 3ds Max view port. The position of the view port “Icon” or Helper object needs to be transferred to the particle system in some way. By connecting the scaling data X-Size, Y-Size, Z-Size the dimensions of the dragged view port “Icon” are transferred to the StdEmitter Node. The position and alignment of the view port “Icon” is transferred to the particle generator by the use of a NodeHelper node.
The position output of the StdEmitter node is fed into the PositionBorn operator as well as the Direction (Alignment of the view port “Icon”. GetDirection was used to turn the Alignment output into a direction vector used for the particle emission direction. Those two connections are needed to make sure that if the user rotates or moves the view port icon, the particles will follow with their emission direction and position as well.
Step 6
Preparation to create UI-Controls for our TD-Tool particle system.
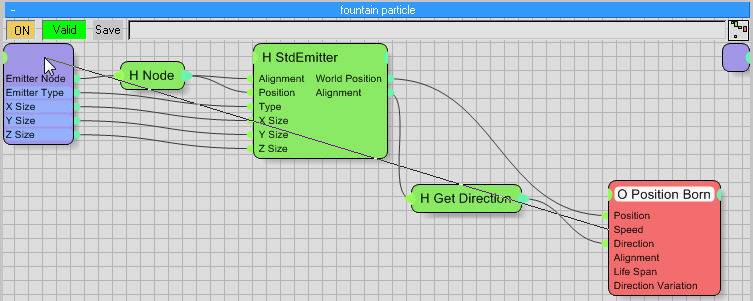
Drag and drop the following connections (wires) from the PositionBorn node to the DynamicSet Input Ports area (as shown above). Dragging the wire to an empty space will automatically create the port and connect the wire.
Connect the following ports (all from PositionBorn)
- Speed
- Life Span
- Direction Variation
SAVE your progress!!
Step 7
Adding a new Rollout menu.
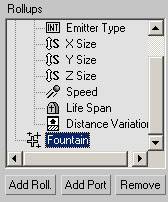
With the fountain particles DynamicSet selected, click the “Add Roll.” button to add a new rollout menu for the TD-Tool. Rename this menu to “Fountain”, this is done by a single long click onto the newly created Tree-View entry, in the Tree-View dialog shown above.
As you can see the “Speed” input port and the other ports as well have been added automatically to the list of available ports. All ports collected under “None” are not visible in the user interface that we are going to create in the next coming steps.
Step 8
Create UI-Elements
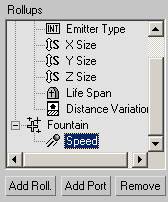
Drag the Speed port down to the newly created Fountain rollout menu, this will make the user interface appear in the main 3ds Max rollout menu (as shown below).
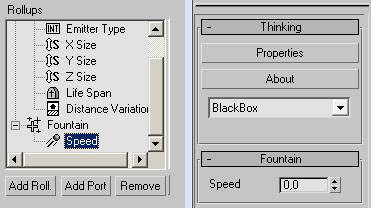
Do the above mentioned method for all newly added ports from the PositionBorn operator. This will add more controls to the user interface of 3ds max.
SAVE your progress!!
Step 9
Rename the ports

To rename the ports and the User Interface controls, single long click on the port name and rename it. use the names as shown above. Speed becomes “Height”; Direction Variation becomes “Spread” and Strength becomes “Gravity”. The gravity effect will be discussed in the next step.
Step 10
Use the Force !
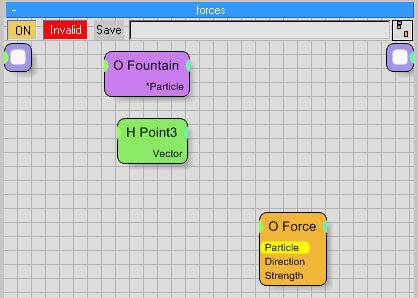
The forces DynamicSet is used to add gravity to the fountain particles. It has been created as a nested sub set of the main fountain particle DynamicSet to keep everything self contained when saved as a TD-Tool.
Create the following Nodes:
- Groups/Fountain Particle Node
- Helpers/Standard/Point3 Node
- Operators/Dynamics/Force Dynamics Node
Step 11
Wire baby Wire !
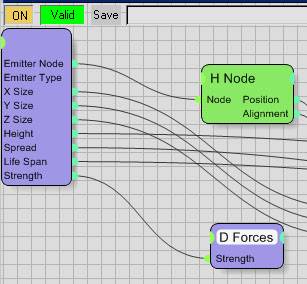
Wire the nodes as shown above.
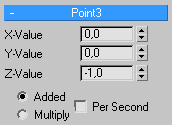
As we want to make sure that the gravity force is always pointing down, we'll have to set the Point3 helper node to a negative Z-Value (as shown below).
One noticeable wiring is the Strength value coming from the Force Node to the input port area of the DynamicSet. This feeds the Strength value one level up in the hierarchy, as shown below.
Here, you can see the “fountain particle” DynamicSet.
Step 12
Set the defaults.
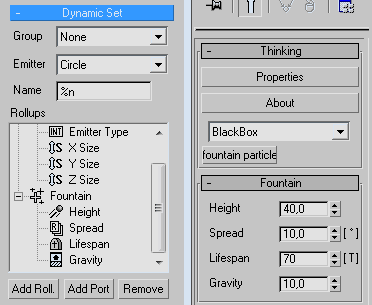
Default values can easily be set by changing the values in the 3ds Max user interface that appears when the DynamicSet is selected. Type in the numbers as shown above.
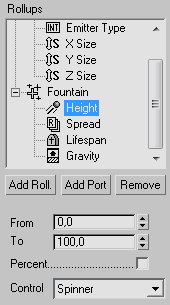
To set the minimum and maximum values or other user interface specific options, select the port and adjust the relevant settings underneath.
In the example shown above the Height was set to an allowed value between 0 and 100.
Final Step
Now, that everything is setup and adjusted, make sure you save the file once again and keep it in a save place. As this file will be the source for any modifications you want to do to the final TD-Tool.
To create the TD-Tool you need to save the DynamicSet onto the hard disk into a thinkingParticles known folder (BlackBox folder). To do this select the DynamicSet and press the Save button (as shown below).
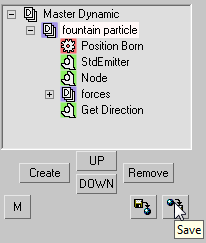
A standard Save dialog opens and you should choose a path to store the TD-Tools in. If you choose a new path this one is automatically added to the search paths of thinkingParticles. name the file “fountain particle”.
When the file is saved, a TD-Tool is created. You can confirm this by checking the 3ds Max rollout menu of thinkingParticles. It should look like the illustration shown below.

Depending on the selected path (the drop down menu above) the available TD-Tool particle systems will show up as standard buttons named as chosen on save.
How do I use it then ?
To test it out follow those steps :
- Reset 3ds Max
- Create thinkingParticles helper node
- Change to the Modify panel
- Click the “fountain particle” button
- Click and Drag a small circle “fountain particle” system into view port
- Press Play!
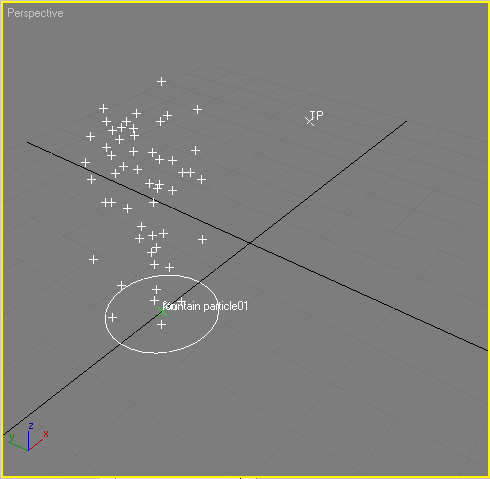
Congratulations you just created your very first TD-Tool particle system! Whenever you click the “fountain particle01” icon you will get the UI interface in the standard 3ds Max rollout menu section and you do not need to open or touch thinkingParticles to adjust the parameters.
©2024, cebas Visual Technology Inc.

