Table of Contents
Groups Overview

Every time you create a Particle Group within the Particle Group Tree View, you automatically create new Group operators within the Create Rollouts. The two entities are inexorably linked together, and you can select your Particle Groups from either the Particle Group Tree View or from within the Wire Setup View.
If you're Particle Group Tree View looks like this:

Then you'll see the following in the Create → Groups Rollout:

As you can see, there is a direct one-to-one relationship for all of the groups in that they not only exist in a hierarchical tree view on the left side of the interface, but they also exist as operators that can be used to wire up parameters on the right side of the interface.
Now when you click on the Group within the Group Tree View, you will be presented with a number of Rollouts on the right-hand side of the user interface. These Rollouts let you set how the particles look in the 3ds Max view ports, as well as add Data Channels to each group for use within your Wire Setup View. These Data Channels can be very useful for advanced effects and give you an extra amount of flexibility when building your particle animations. Keep reading to learn more about these Data Channels.
Remember that the look and display for your individual particle groups will show up as you set them in the Groups Rollouts, unless you turn on the Force this Setting check box within the Master Dynamic rollout from within the DynamicSet Tree View.
What is a Data Channel?
Data Channels is a technology used in thinkingParticles since R1. With the release of thinkingParticles Version 3.0 the Data Channel concept should no longer be used to transfer data between particles. Instead the newly introduced memory operator should be used whenever possible. However, because of compatibility, this feature is still implemented and fully functional and for complex BlackBoxes data channels might be still a good choice!
One concept is the ability to attach any kind of value to a particle. Data Channels are a very flexible way of adding features to a particle that are not necessarily known to the system beforehand. What this means is that you can define new Output Data Streams for your Group Operators that represent data it would not normally be aware of. These output data streams can be based on their own rules and conditions.

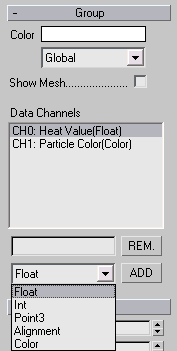
As you can see from the screen shot above, every particle Group has a basic parameter set with various controls. One control is the viewport display or color assigned to the particles in that group. Another standard option in the particle group is the Data Channels list. Several value types can be added to a particle group.
The options are:
- Float
- Int
- Point3
- Alignment
- Color
Next, we'll discuss how you can utilize these various Data Channel types to your advantage.
How do Data Channels work?
There are situations where your particle animation might need one or more special values that are usually not part of a standard thinkingParticles particle data stream. A particle data stream handles all of the information that is needed to control and modify the particle behavior. Particle Size, Age, Alignment, Mass and many more are common parameters that are needed by many of the operators.
The concept surrounding a Data Channel may take a bit of getting used to, but it can be a VERY powerful tool for you when needed. Since the data that comes from this channel can be driven by other rules and conditions, you can build very complicated data streams which can refine your particle animation.
There are several steps needed in order to create a new Data Channel.
- Within the Group itself, you must add a new Data Channel Type.
- Select a value type (Float) from the drop down list.
- In the text edit field above, type in a descriptive name for this value
- Press the Add button to add the parameter to the particle Group
- Next, you need to create the Data Channel by creating a Data Channel Operator in your Wire Setup View.
- Once you have a Data Channel Operator, you must Initialize it.
1A) You connect the Particle Group (the one that has the channel from Step #1) to it so that it uses these particles as its source.
2A) Next, you feed in a data stream value that represents the data type you want it to represent.
This may sound confusing, so let's walk through a quick example.
Lets say that a data stream is needed to represent the Heat value for a particle. How would this be done? A particle data stream doesn't provide this kind of information natively, but by using a Data Channel, it should be possible to construct one.
The first thing the user would do is select their Particle Group in the Particle Group Tree View. Next, they would consider which kind of data value they would expect from this custom Output Data Stream. In this example, let's assume they want it as a Float value. So you choose a name and select the Float data type and hit ADD as shown below.

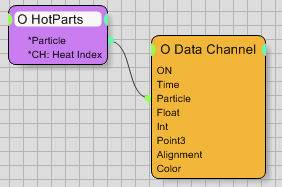
Once you have created a new channel, you need to define it. So you go to your DynamicSet and add a new Data Channel operator into your Wire Setup View, along with the Group that has the new data channel. You connect them so that the Data Channel is using the modified Group as the source.

As you can see above, there is a particle Group called HotParts that contains the new data channel called Heat Index. This is the Float data stream that was set up previously within the HotParts Group. Next, you need to feed in a Float value to the Data Channel operator to initialize it.
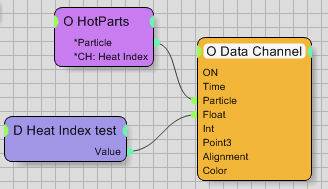
This is where the fun really starts. You can really get as in-depth here as you like, since you don't have to pipe a static value into this Data Channel. For instance, perhaps to determine the Heat Index value, you could create a set of rules (maybe as a Black Box) that calculates the number and force of the collisions each particle has had, in a specified amount of time. A particle with more collisions would appear to be much “hotter” and get a higher Heat Index value. Those particles that exceed the Heat Index value might then be passed to another Group to further refine their motion - such as increasing their speed to indicate an “excited state”.

In the example above a Black Box called Heat Index Test has been added to the DynamicSet and pipes its Output Data Stream into the Data Channel.
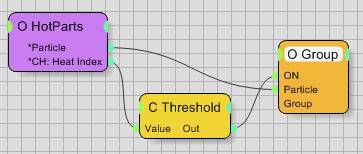
So what happens next? Now that the new Data Channel is set up and has a value being fed into it, it can be used from within the particle Group just like any other Output Data Stream. As shown below, a new DynamicSet was created to test the Heat Index value, and based on a set Threshold Condition, particles exceeding that value are placed into a new Group Operator called Group.

One more thing worth noting is, that since you are not limited to a single Data Channel within your particle Groups, you must take care to keep them all in order. To do this, the Data Channel Operator contains a single spinner within it, where you will set it's Index Value. It is important that you NOT give two separate Data Channels the same Index Value, since this number determines which Data Channel is affected within your particle animation.
![]()
As demonstrated with this little example, thinkingParticles offers unlimited flexibility and lets you create and control particle effects in ways no other system can provide.
©2024, cebas Visual Technology Inc.
