TD-Tool

thinkingParticles can be seen as a highly specialized tool allowing you to do everything one can dream or imagine. However, to unleash all the power thinkingParticles offers; some training and a good background of physics, math and animation methods is needed. Due to the complex matter that thinkingParticles can do, it is not likely that every 3D artist is able to or even willing to learn thinkingParticles to the extent needed.
The introduction of the TD-Tool finally offers the functionality to build a production pipeline that allows you to integrate thinkingParticles into a studio work flow with a mixed or changing staff of animators. One or more thinkingParticles specialists can easily create a self contained particle system with user exposed settings and controls, the average animator is fully released from any training or learning stress. A TD-Tool setup will allow you to expose only those parameters to the user that he needs to see or know. There are 2 possible uses for the TD-Tool:
- Create a simple 3ds Max conformed user interface for a complex DynamicSet
- Create a closed, self-contained particle system that can be easily created like any other 3ds Max particle system
The method to create the particle system setups, described above, is always the same. However, to create a self-contained particle system as listed in option 2, an emitter type needs to be specified.
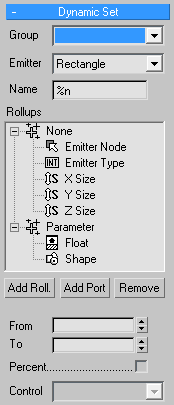
Whenever a DynamicSet is selected, it offers a main set of controls that represents the “TD-Tool”. The controls along with the interface are shown below.

Group - this control defines the particle group that should be stored along with the DynamicSet when saved as a black box. (setting this option is no longer needed! This is an option for compatibility with old scenes, only)
Emitter - defines the Emitter type to be used for “easy click” particle systems. When an emitter type is chosen, a set of parameters is automatically added as DynamicSet Inputs (see image above). A rectangle emitter was chosen in the example above, along with X, Y, Z ports, to specify the dimensions that have been automatically added to the DynamicSet input ports. Those ports automatically appear in the None Tree-View section of the Rollups list.
Name - specifies a particle name that will be used when an emitter is created. This option is only valid when an emitter type is chosen.
Rollups List Box - displays all available roll up menus for this DynamicSet. Standard windows Drag and Drop mouse operations allow you to sort or re-organize the appearance of the menu sections or parameters.
Add Roll. - when pressed a new Rollout-Menu will be added to the list of menus. A single long click will allow you to rename the newly created menu.
AddPort - adds an input port to the selected menu section. Several different input ports are available from the list and every port may also be renamed, with a single long click on its name.
Remove - removes the selected port or menu entry.
From - sets the minimum value that the port can have.
To - sets the maximum value a port should be able to get.
Percent - turns the value into a percentage instead of a plain number value.
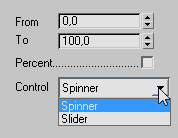
Control - is a context sensitive drop down menu that shows the available UI options for a given port. Depending on the type of port, there may be several user interface options to choose form. An integer, for example, may be a simple single value or a multiple value check box or list box .

Tip
The starting value of a UI element can be easily set when the UI interface is displayed in the rollout. The value set there will be used whenever this interface is created for the first time.
Example

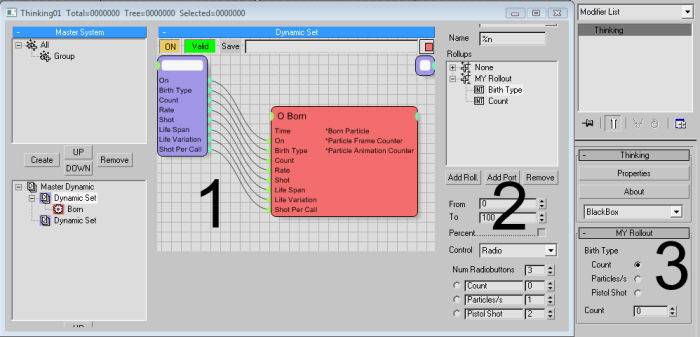
The example shown above, uses the described method (1) to expose some easy controls from the DynamicSet to the user. By dragging the connections from the Born-Node to the DynamicSet input port, new values are created. Those values appear automatically in the Roll up list box under None (2). By dragging the Birth Type and Count to the My Rollout menu section the UI elements appear. Some simple adjustments to the Birth Type integer value allow you to create a simple (3) Radio Button control. Now, when someone clicks the DynamicSet the easy User Interface is displayed.
To learn more check out the Tutorial: Making a TD-Tool Fountain Particle System
©2024, cebas Visual Technology Inc.
