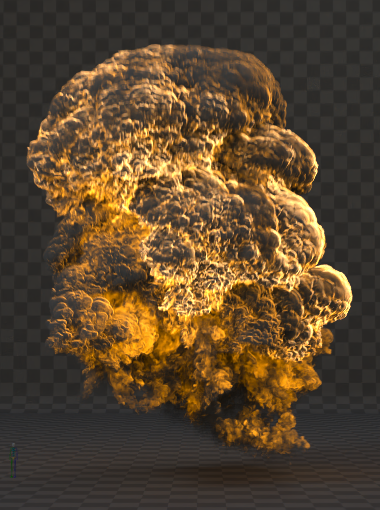
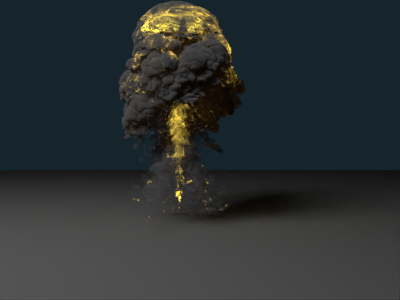
The fR-PyroVDB material was created to render primarily Fire and Smoke effects based on OpenVDB volume data. To learn more about what OpenVDB is and what it does check out this Primer on OpenVDB. This shader is highly optimized for fire and smoke effects and to render them in a very efficient manner.
All volume rendering is done through highly optimized NanoVDB. NanoVDB fully supports finalRender's trueHybrid rendering approach and offers an incredibly fast volume rendering even on CPU. However, NanoVDB really shines on modern NVIDIA GPU cards.
This shader is meant to be assigned to any fR-Volume Object or any of the finalFluid Grid Domains in a scene.
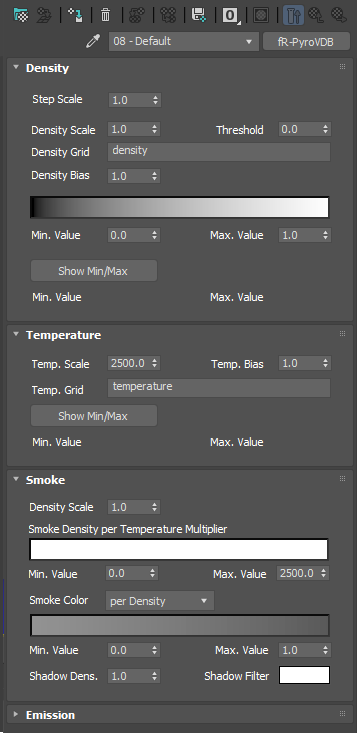 Step Scale - sets the ray-marching steps to be used for the sampling of the volume. Larger Step Scale values will result in faster renderings but may show artifacts. Keep this value as low as possible.
Density Scale - acts as a multiplier to the density value in the volume grid. The value found in the voxel of the grid will be multiplied by this amount. If the volume grid has proper density values ranging between 0-1 the default value of 1.0 will represent the cloud as it was initially calculated.
However, volume grids can have all sorts of insane values that might be right or wrong. For example if density values are to be found between 0-100. You might want to set the multiplier to 0.01 to bring the values back to manageable density ranges.
Threshold - every value found in the gird that falls below this threshold will be treated as 0 (invisible or fully transparent).
Density Grid - the specified grid must be of Type Fog or Scalar. The expected range is to be 0-1. Excessive density values will result in insane long render times without any real benefit.
Density Bias - this control allows to shift the center point of the density up or down. A value of 1 means all values coming from the density grid will be linear. Values below 1 will make smaller density values bigger and values above 1 will make higher densities smaller.
Gray scale Gradient - this gradient acts as a "curve" control to fine tune density changes within the volume grid.
The left hand side represents the minimum value of the density grid and the right hand side the maximum value of the density grid.
The Gray scale color value represents the density value to choose from where a black color being a 0 or Min. Value density
Min. Value - sets the minimum value (left hand side) of the gradient
Max. Value - sets the maximum value (right hand side) of the gradient
Show Min/Max - depending on the source of the volume (either finalFluid/tP or VDB file).
Direct volume rendering, will show the last Min/Max values available from rendering.
Temp. Scale - several fluid products create fluid simulations by specifying a heat value between 0-1. To map this to real world Kelvin temperature values for flames (0-1500) the incoming temperature values need to be multiplied by 1500 or 2500 to get Celsius or one 3/7th of a gazillion to have Fahrenheit.
Temp. Bias. - this control allows to shift the center point of the temperature up or down. A value of 1 means all values coming from the temperature grid will be linear. Values below 1 will make smaller values bigger (hotter) and values above 1 will make brighter values darker.
Temp. Grid - lets You select a temperature grid from the VDB file.
Show Min/Max - depending on the source of the volume (either finalFluid/tP or VDB file).
Direct volume rendering, will show the last Min/Max values available from rendering.
This section of the Pyro shader allows you to control smoke based on its density or temperature value in the smoke volume grid.
Density Scale - acts as a multiplier to the smoke density value in the volume grid. The value found in the voxel of the grid will be multiplied by this amount. If the volume grid has proper density values ranging between 0-1 the default value of 1.0 will represent the cloud as it was initially calculated.
However, volume grids can have all sorts of insane values that might be right or wrong. For example if density values are to be found between 0-100. You might want to set the multiplier to 0.01 to bring the values back to manageable density ranges.
Smoke Density per Temperature Multiplier - this gradient allows You to control the smoke density based on its temperature. Min and Max values control the ranges for the smoke temperature. With this control You could easily simulate soot or ash which is opaque by nature regardless of its temperature.
Min. Value - sets the minimum value (left hand side) of the gradient
Max. Value - sets the maximum value (right hand side) of the gradient
Smoke Color - this gradient controls the color of the smoke based on the following options:
For example, less dense smoke could be set to a white ash color or a cold smoke could be set to a darker color.
Min. Value - sets the minimum value (left hand side) of the gradient
Max. Value - sets the maximum value (right hand side) of the gradient
Shadow Density - controls the density of the shadow cast or received.
Shadow Filter Color - lets you add a color filter for the shadow.
Enable Emission - check this option to simulate a GI light emission from the Fire effect. Emission will also mimic the effect of self illumination when the Blur option is enabled as well.
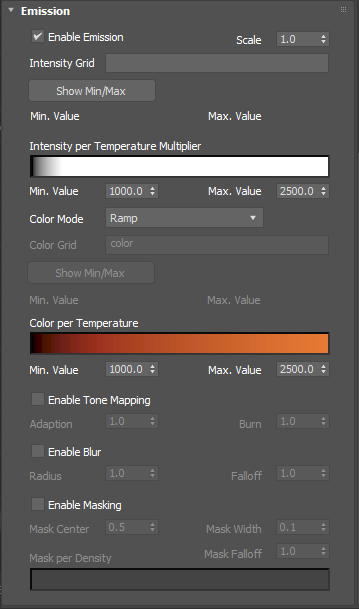 Scale - acts as a global multiplier for the Emission effect
Intensity Grid - sets a Volume Grid to control the Emission Intensity within the volume.
Show Min/Max - depending on the source of the volume (either finalFluid/tP or VDB file).
Direct volume rendering, will show the last Min/Max values available from rendering.
Intensity per Temperature Multiplier - this gradient allows You to control the emission intensity based on its temperature. Min and Max values control the ranges for the emission intensity.
Min. Value - sets the minimum value (left hand side) of the gradient
Max. Value - sets the maximum value (right hand side) of the gradient
Color Mode - defines which source to use for emanating the color from the volume grid. There are 4 options available.
Grid - select any RGB (Vector) volume grid to define the color in the volume.
Ramp - choose this option to use the color gradient to define the color of the volume grid based on its temperature.
Black Body Color - this mode calculates the Black Body Color, only. The intensity, however, is not based on the Black Body model.
Planck Black Body - choose this option to use the full Spectral Physics based Black Body algorithm. This is the most accurate to nature effect possible. Keep in mind this needs proper physically accurate setups.
Color Grid - active when Grid is selected. Choose any available color grid from the VDB Volume.
finalRender allows you to easily combine 3 separate float grids into one color grid (vector). Instead of supplying the name of one VDB color grid, you may supply 3 individual float grids and combine them with a + sign.
Example:
Color_R+Color_G+Color_B
Show Min/Max - depending on the source of the volume (either finalFluid/tP or VDB file).
Direct volume rendering, will show the last Min/Max values available from rendering.
Color Per Temperature Gradient - defines the color based on the temperature of the volume grid.
Min. Value - sets the minimum value (left hand side) of the gradient
Max. Value - sets the maximum value (right hand side) of the gradient
Enable Tone Mapping -Check this option to activate Tone Mapping of the emission colors.
Adaption - controls the darker colors of the effect.
Burn - lets You adjust the brighter (hotter) colors of the effect.
Enable Blur - check this option to mimic the effect of self illumination or light scattering within the volume. This is an extremely fast and efficient method to simulate light scattering.
Radius - sets the blur radius around each voxel
Falloff - defines a radial fall off distance for the blur effect
Enable Masking - check this option to enable in depth control of the transition zones within a smoke and fire effect. this lets you soften or sharpen the transition zones between the hot and cold borders of the fire effect.
Mask Center - defines the center point of the transition between hot and cold (smoke).
Mask Width - lets You adjust the crispiness of the cold veins. Smaller values will create sharper more contrast veins while larger values will make the transition wider and softer.
Mask Falloff - defines how fast the effect of the smoke/fire mask falls off
Mask per Density Gradient - this gradient allows to fine tune the masking based on density.
Examples:
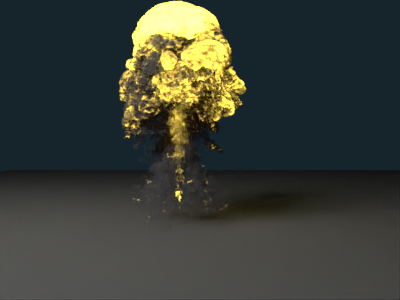 |
 |
| No Masking used | Masking = ON |