Table of Contents
The thinkingParticles User Interface
You'll soon learn that thinkingParticles is a plug-in that will challenge your brain daily. One reason for all of the brain work is that the ultimate power of this particle system comes from its total freedom when it comes to command handling. thinkingParticles gets its power from a large number of simple operators and conditions that can be freely connected and arranged in infinite combinations. These smaller building blocks are easy to manage, yet give you a wide range of flexibility not available with other tools. This is similar to the concept behind 3ds Max itself - the real power of the software comes from its wealth of plug-ins and the ability users have to customize their tool-set, and not from a limited number of built-in features.
Of course, before you start learning how to build your own amazing particle animations, you must learn a bit more about the thinkingParticles interface. The old adage “you must learn to crawl before you can walk” was never more true.
The Interface
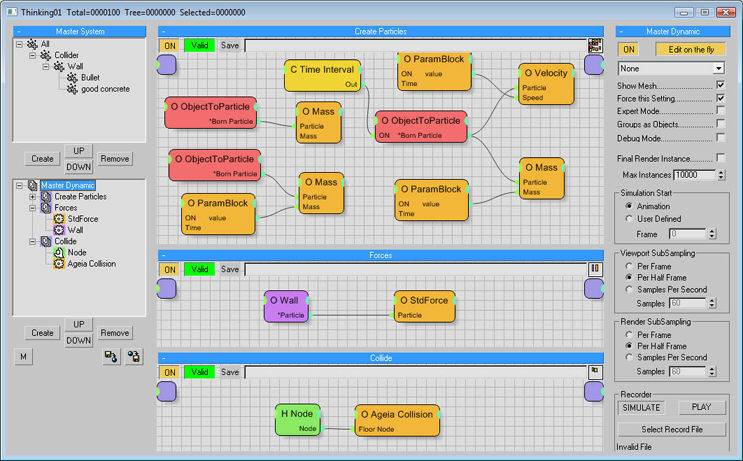
thinkingParticles is fully controlled through a mode less user interface as shown above. While it may look confusing, it is actually very logically laid out, and we'll discuss that in a few moments. But a more important question at this point is:
How do I get to this interface?
To access the thinkingParticles interface, you must create a thinkingParticles 3 helper node in the 3ds Max view ports first. Like all standard 3ds Max particle systems, thinkingParticles is Located within the Create command panel under Particles Systems:
When you click on the Thinking button and then click in any of the view ports, you'll get a helper node that looks like a small yellow X that has the letters TP next to it as shown below.
From this tiny and rather plain looking Helper object, you'll eventually create some mind boggling particle animations!
Once the TP helper created, you can now get access to the thinkingParticles interface via two methods:
- With the TP helper selected, click on the Properties button within the Modify tab.
- Use the shortcut keys: Alt+Shift+P.
That will bring up the thinkingParticles dialog.
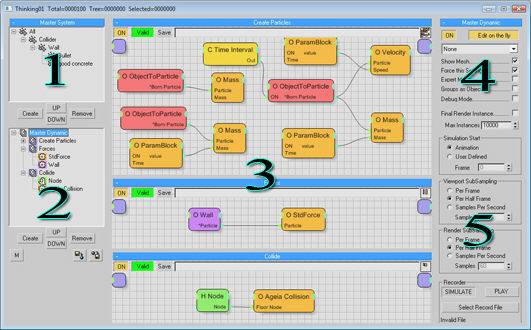
So now that you have access to the interface, what does it all mean? Simply put, the main user interface is divided into 5 main functional areas.
The various functional areas within the thinkingParticles 2 dialog
- Particle Group Tree View - This is where you set up different Groups to contain your particles.
- DynamicSet Tree View - This is where you organize your collections of nodes and operators.
- Main Wire Setup View - This is the schematic area where you wire together your nodes and operators.
- Create Rollout Panels - This is the area where you choose the various nodes and operators to add to your Wire Setup View area.
- Parameter Rollout Menus - This is where you modify the parameters associated with a particular node or operator.
Several of these areas, including the Wire Setup View, the Create Rollout Panels and the Parameter Rollouts will change depending on what is selected within the thinkingParticles interface.
- Depending on what DynamicSet you have selected, the Wire Setup will change to show the nodes and operators that are contained within it.
- Depending on what operator or node is selected within the Wire Setup View, the Parameter Rollouts will change to reflect the controls available for the selected node.
- Depending on which group of operators or nodes you want to select in the Create Rollouts, the Rollouts will change to show you the currently selected group of options for those tools.
There are more connections and changes that will be discussed throughout this manual, but you should get the idea. This 'change on the fly' functionality is no different than 3ds Max itself as the software updates as you work to show you the tools needed for a selected object or node in your scene, so be aware that this is also the case within thinkingParticles .
Beyond the areas mentioned above it is also worth noting that thinkingParticles also takes advantage of the small space within the Title Bar as well (as shown above). The cebas team has placed particle information in this area so you can keep track of how many particles your system is dealing with at any point in time. It will update as more particles are born, moved and selected.
Where to go Next?
Now that you've know how to get to the thinkingParticles interface and where the various information is created and stored, it's time to look at the components of the User Interface more closely.
While it is highly recommended that you go onto the Particle Group Tree View, if you prefer you can click on any of the topics that interest you.
©2024, cebas Visual Technology Inc.


